by editor | Sep 7, 2025 | Critical Thinking, Environmental Literacy, Experiential Learning, Integrating EE in the Curriculum, K-12 Activities, Language Arts, Learning Theory
by Jim McDonald
The demands on classroom teachers to address a variety of different subjects during the day means that some things just get left out of the curriculum. Many schools have adopted an instructional approach with supports for students that teach reading and math, with the addition of interventions to teach literacy and numeracy skills which take up more time in the instructional schedule. In some of the schools that I work with there is an additional 30 minutes a day for reading intervention plus 30 more minutes for math intervention. So, we are left with the question, how do I fit time for science or environmental education into my busy teaching schedule?
In a recent STEM Teaching tools brief on integration of science at the elementary level, it was put this way:
We do not live in disciplinary silos so why do we ask children to learn in that manner? All science learning is a cultural accomplishment and can provide the relevance or phenomena that connects to student interests and identities. This often intersects with multiple content areas. Young children are naturally curious and come to school ready to learn science. Leading with science leverages students’ natural curiosity and builds strong knowledge-bases in other content areas. Science has taken a backseat to ELA and mathematics for more than twenty years. Integration among the content areas assures that science is given priority in the elementary educational experience (STEM Teaching Tool No. 62).
Why does this matter? Educators at all levels should be aware of educational standards across subjects and be able to make meaningful connections across the content disciplines in their teaching. Building administrators look for elementary teachers to address content standards in math, science, social studies, literacy/English Language arts at a minimum plus possibly physical education, art, and music. What follows are some things that elementary teachers should consider when attempting integration of science and environmental education with other subjects.
Things to Consider for Integration
The integration of science and environmental education concepts with other subjects must be meaningful to students and connect in obvious ways to other content areas. The world is interdisciplinary while the experience for students and teachers is often disciplinary. Learning takes place both inside and outside of school. Investigations that take place outside of school are driven by people’s curiosity and play and often cut across disciplinary subjects. However, learning in school is often fragmented into different subject matter silos.
Math and reading instruction dominate the daily teaching schedule for a teacher because that is what is evaluated on standardized tests. However, subjects other than ELA and math should be kept in mind when considering integration. Social studies and the arts provide some excellent opportunities for the integration of science with other content areas. In the NGSS, the use of crosscutting concepts support students in making sense of phenomena across science disciplines and can be used to prompt student thinking. They can serve as a vehicle for teachers to see connections to the rest of their curriculum, particularly English/Language Arts and math. Crosscutting concepts are essential tools for teaching and learning science because students can understand the natural world by using crosscutting concepts to make sense of phenomena across the science disciplines. As students move from one core idea to another core idea within a class or across grade-levels, they can continually utilize the crosscutting concepts as consistent cognitive constructs for engaging in sense-making when presented with novel, natural phenomena. Natural phenomena are observable events that occur in the universe and we can use our science knowledge to explain or predict phenomena (i.e., water condensing on a glass, strong winds preceding a rainstorm, a copper penny turning green, snakes shedding their skin) (Achieve, 2016).
Reading
Generally, when I hear about science and literacy, it involves helping students comprehend their science textbook or other science reading. It is a series of strategies from the field of literacy that educators can apply in a science context. For example, teachers could ask students to do a “close reading” of a text, pulling out specific vocabulary, key ideas, and answers to text-based questions. Or, a teacher might pre-teach vocabulary, and have students write the words in sentences and draw pictures illustrating those words. Perhaps students provide one another feedback on the effectiveness of a presentation. Did you speak clearly and emphasize a few main points? Did you have good eye contact? Generally, these strategies are useful, but they’re not science specific. They could be applied to any disciplinary context. These types of strategies are often mislabeled as “disciplinary literacy.” I would advocate they are not. Disciplinary literacy is not just a new name for reading in a content area.
Scientists have a unique way of working with text and communicating ideas. They read an article or watch a video with a particular lens and a particular way of thinking about the material. Engaging with disciplinary literacy in science means approaching or creating a text with that lens. Notably, the text is not just a book. The Wisconsin DPI defines text as any communication, spoken, written, or visual, involving language. Reading like a scientist is different from having strategies to comprehend a complex text, and the texts involved have unique characteristics. Further, if students themselves are writing like scientists, their own texts can become the scientific texts that they collaboratively interact with and revise over time. In sum, disciplinary literacy in science is the confluence of science content knowledge, experience, and skills, merged with the ability to read, write, listen, and speak, in order to effectively communicate about scientific phenomena.
As a disciplinary literacy task in a classroom, students might be asked to write an effective lab report or decipher the appropriateness of a methodology explained in a scientific article. They might listen to audio clips, describing with evidence how one bird’s “song” differs throughout a day. Or, they could present a brief description of an investigation they are conducting in order to receive feedback from peers.
Social Studies
You can find time to teach science and environmental education and integrate it with social studies by following a few key ideas. You can teach science and social studies instead of doing writer’s workshop, choose science and social studies books for guided reading groups, and make science and social studies texts available in your classroom library.
Teach Science/Social Studies in Lieu of Writer’s Workshop: You will only need to do this one, maybe two days each week. Like most teachers, I experienced the problem of not having time to “do it all” during my first year in the classroom. My literacy coach at the time said that writer’s workshop only needs to be done three times each week, and you can conduct science or social studies lessons during that block one or two times a week. This was eye-opening, and I have followed this guidance ever since. My current principal also encouraged teachers to do science and social studies “labs” once a week during writing time! Being able to teach science or social studies during writing essentially opens up one or two additional hours each week to teach content! It is also a perfect time to do those activities that definitely take longer than 30 minutes: science experiments, research, engagement in group projects, and so forth. Although it is not the “official” writers workshop writing process, there is still significant writing involved. Science writing includes recording observations and data, writing steps to a procedure/experiment, and writing conclusions and any new information learned. “Social studies writing” includes taking research notes, writing reports, or writing new information learned in a social studies notebook. Students will absolutely still be writing every day.
Choose Science and Social Studies Texts for Guided Reading Groups: This suggestion is a great opportunity to creatively incorporate science and social studies in your weekly schedule. When planning and implementing guided reading groups, strategically pick science and social studies texts that align to your current unit of study throughout the school year. During this time, students in your guided reading groups can have yet another opportunity to absorb content while practicing reading strategies.
Make Science and Social Studies Texts Available and Accessible in Your Classroom Library: During each unit, select texts and have “thematic unit” book bins accessible to your students in a way that is best suited for your classroom setup. Display them in a special place your students know to visit when looking for books to read. When kids “book-shop” and choose their just-right books for independent reading, encourage them to pick one or two books from the “thematic unit” bin. They can read these books during independent reading time and be exposed to science and social studies content.
Elementary Integration Ideas
Kindergarten: In a kindergarten classroom, a teacher puts a stuffed animal on a rolling chair in front of the room. The teacher asks, “How could we make ‘Stuffy’ move? Share an idea with a partner”. She then circulates to hear student talk. She randomly asks a few students to describe and demonstrate their method. As students share their method, she will be pointing out terms they use, particularly highlighting or prompting the terms “push” and “pull”. Next, she has students write in their science notebooks, “A force is a push or a pull”. This writing may be scaffolded by having some students just trace these words on a worksheet glued into the notebook. Above that writing, she asks students to draw a picture of their idea, or another pair’s idea, for how to move the animal. Some student pairs that have not shared yet are then given the opportunity to share and explain their drawing. Students are specifically asked to explain, “What is causing the force in your picture?”.
For homework, students are asked to somehow show their parents a push and a pull and tell them that a push or a pull is a force. For accountability, parents could help students write or draw about what they did, or students would just know they would have to share the next day.
In class the next day, the teacher asks students to share some of the pushes and pulls they showed their parents, asking them to use the word force. She then asks students to talk with their partner about, “Why did the animal in the chair sometimes move far and sometimes not move as far when we added a force?”. She then asks some students to demonstrate and describe an idea for making the animal/chair farther or less far; ideally, students will push or pull with varying degrees of force. Students are then asked to write in their notebooks, “A big force makes it move more!” With a teacher example, as needed, they also draw an image of what this might look like.
As a possible extension: how would a scientist decide for sure which went further? How would she measure it? The class could discuss and perform different means for measurement, standard and nonstandard.
Fourth Grade Unit on Natural Resources: This was a unit completed by one group of preservice teachers for one of my classes. The four future elementary teachers worked closely in their interdisciplinary courses to design an integrated unit for a fourth-grade classroom of students. The teachers were given one social studies and one science standard to build the unit around. The team of teachers then collaborated and designed four lessons that would eventually be taught in a series of four sessions with the students. This unit worked to seamlessly integrate social studies, English language arts, math, and science standards for a fourth-grade classroom. Each future teacher took one lesson and chose a foundation subject to build their lesson upon. The first lesson was heavily based on social studies and set the stage for the future lessons as it covered the key vocabulary words and content such as nonrenewable and renewable resources. Following that, students were taught a lesson largely based on mathematics to better understand what the human carbon footprint is. The third lesson took the form of an interactive science experiment so students could see the impact of pollution on a lake, while the fourth lesson concluded with an emphasis on language arts to engage students in the creation of inventions to prevent pollution in the future and conserve the earth’s resources. Contrary to the future educators’ initial thoughts, integrating the various subject areas into one lesson came much more easily than expected! Overall, they felt that their lessons were more engaging than a single subject lesson and observed their students making connections on their own from previously taught lessons and different content areas.
References
Achieve. (2016). Using phenomena in NGSS-designed lessons and units. Retrieved from https://www.nextgenscience.org/sites/default/files/Using%20Phenomena%20in%20NGSS.pdf
Hill, L., Baker, A., Schrauben, M. & Petersen, A. (October 2019). What does subject matter integration look like in instruction? Including science is key! Institute for Science + Math Education. Seattle, WA: University of Washington Retrieved from: http://stemteachingtools.org/brief/62
Wisconsin Department of Public Instruction. (n.d.) Clarifying literacy in science. Retrieved from: https://dpi.wi.gov/science/disciplinary-literacy/types-of-literacy
 Jim McDonald is a Professor of Science Education at Central Michigan University in Mt. Pleasant, Michigan. He teaches both preservice teachers and graduate students at CMU. He is a certified facilitator for Project WILD, Project WET, and Project Learning Tree. He is the Past President of the Council for Elementary Science International, the elementary affiliate of the National Science Teaching Association.
by editor | Sep 2, 2025 | Environmental Literacy, K-12 Activities
GRADES
K-2
Science
Animal Ingenuity
Explore how animal use materials from the environment in building homes. Start by looking at a bird’s nest. Examine the nest carefully. Use a hand lens. List all the materials you find in the nest. How is it held together?
Social Studies
Careers Notebook
Make a “Careers Notebook” of environmentally-related careers. You can start with a fisherperson, mechanic, newpaper reporter, and a fish and game officer. Keep going from there.
Seafood Survey
Many cultures depend heavily on food from the sea for their sustenance. Have students survey family members and friends about the types of seafood they like to eat. This can be graphed on the chalkboard as well. Follow up survey with a visit to a local fish market or grocery to look at varieties of fish and shell fish up close.
Mathematics
How Many Legs?
Post pictures of an octopus, a seastar, a crab, and a gull. Review as a class the number of legs each animal has, and discuss the ways each animal’s legs help it to survive. Next challenge students with addition problems, such as: How many legs would there be if we had added the legs of the octopus and the gull? The seastar and the crab?
Geometric Shapes in Nature
Geometric shapes can be found in twigs, rocks, leaves, insects, and feathers. Look for cubes, cylinders, pyramids, cones, ovals, spheres, spirals, etc. have students put specimens in like piles. Variation: Human-made shapes. Triangles, squares, dcircles, rectangles, etc., can be found at school in sidewalks, buildings, clothing.
Language Arts
Appropriate Stories About Nature
Storytelling about nature, the outdoors, and the environment is fun. School and public libraries can be of great help in selecting books. Build a story repertoire as you would with songs.
Finding Adjectives
Give each child a small piece of paper with one or more adjectives that describe something in nature (e.g., smooth, slimy, triangular, expanded, cool, soft and green, round and gooey). Have students explore a natural area to find items that meet these descriptions. Let students take turns sharing what they found. —JOD
Fine Arts
Be a Tree
Have students identify characteristics of trees. Visit trees in a back yard, in an orchard, in a park, or in the school year.
Have the students do tree dramatizations, using their arms as the branches and their legs as the trunk. How does the tree look during a storm? How does a fruit tree look in the spring? How does a young tree look in comparison with an old tree? What would happen to change the tree in different kinds of weather or during the different seasons?
After feeling what it might be like to be a tree, have the students paint pictures of them. — EGO
Make a Refracting Telescope
Use two small convext lenses, a toilet paper tube, cardboard, rubber cember, and paper.
1. Find the focal length of one of the lenses.
2. Cut a lens-size hole in the cardboard
3. Glue the lens over the hole.
4. Trace around the toilet paper tube with a pencil over the spot in the cardboard where the lens is located.
5. Cut on this line, and glue the cardboard-mounted lens in the end of the tube.
6. Wrap a sheet of paper around the tube.
7. Tape it in place.
8. Mount the other lens in the end of the paper tube.
9. Slide the tubes back and forth.
Natural Balance
Collect natural materials, or have students collect them. Suspend them with string under a crossbar of two sticks. Driftwood, acorns, and pine cones are among materials that are effectively used. Hang these in the classroom to brighten the scenery.
GRADES
3-5
Science
Evaluating Growth
Growing plants in crowded and uncrowded situations will show the effects of overpopulation. Fill milk cartons about three-fourths full of soil. Plant several cartons with seeds — some with two or three seeds, several cartons with a small handful and several cartons with a large handful. Varying the amounts of seed in the different cartons creates different conditions under which the plants will grow. After the seeds have become seedlings, measure and record their heights on a piece of paper and draw a line graph on graph paper to represent each group of seedlings. Evaluate the plants’ growth periods in terms of the number of plants under the different conditions. —CTE
Forest Community
Discuss as a group the items a city has and make a list. Suggestions include people, factories, subways, cemetery, apartments, treffic, plumbing, stores, garbage collectors, streets, etc.
Divide the group into smaller ones of 3 to 4 each. Send each group out in a forest or wooded area and have them try and identify the natural item that corresponds to the ones on the list. —ECO
Social Studies
Non-Pointing the Finger
Take a walking tour of the neighborhood. List possible examples of non-point source pollution, both natural and human-caused. Back in the classroom, compile a class list to see how many sources were pin- “pointed.” Use magazine or newspaper pictures to make an informational display of possible sources of non-point water pollution. — FSS
Water, Water Everywhere…NOT!
Point out that last year water was rationed in parts of California. It was shut off altogether in parts of Rhode Island when a leaking gas station tank polluted it. Our carelessness can hurt the water supply. Also, it is important not to waste water if we want to be sure of having enough for our needs. Have students name some ways each of us can help protect our water supply. (Ideas include using less water, not running water needlessly, not littering near bodies of water. Also some environmentalists suggest eating less meat to save water. A vegetarian diet requires much less water in its production than is used in the raising of cattle, for example.) —KT
Mathematics
Shoot the Moon
Knowing that the moon returns to a given position every 29 1/2 days, have students figure out the dates that will have full moons for the coming calendar year. From this they can make their own calendars and check up on themselves. —JOD
Language Arts
Get Your Story Straight!
Invent or find a story that conveys an environmental message you wish to have your students think about. Divide the story into individual events that have ideas or words that allow the student to sequence them in a particular order.
As a group, or individually, have the students read the passages. Have the students number the passages so that the story can be read in the correct order. Read the story aloud in the correct sequential order.
Use discussion and questioning to strengthen the story’s message. —IEEIC
Wet Words
How important is water to our society? Just think how many different words we have to express it. Have students brainstorm words that mean water or a form of water (e.g., splash, drip, etc.) while the teacher lists them on a large sheet of butcher paper. Can your class reach one hundred? Save the list and use it later for creative writing activities.
Fine Arts
Water Drop Necklaces
Give each student a sheet of paper onto which a large water drop has already been drawn on both sides. On one side of the paper, printed inside the water drop are the words, “I’M TOXIC, DON’T FLUSH ME.” On the reverse side of the paper, inside the water drop are written the words, “WATER IS PRECIOUS, AS PRECIOUS AS…” Instruct students to draw one or several toxic items that should not be flushed down the toilet (e.g., paint, oil, chemicals) inside the water drop on the “toxic” side of the paper. On the other side instruct them to draw pictures of one or more persons or items that are precious to them (e.g., grandma, grandpa, a pet, a bicycle).
Once the drawings are completed, have the students cut out the water drop, then punch a hold near the top of the drop using a paper punch and finally thread a string of yarn through the hole to create a necklace. The necklace has a positive “precious” side and a negative “toxic” side depicted by the students’ drawings. — CON
Torn Paper Art
To help the students understand the fibrous make up of paper, tear a scrap of paper and hold one of the torn edges up to the light. Along that edge will appear a slight fuzz. Here and there tiny strands will project separately, like fine hairs. These strands are cellulose fibers.
Discuss with the children all the different materials from which fibers can be harvested to make paper. Show them fibers from a small piece of cloth to illustrate the point.
Using scraps of construction paper, tear and glue different colors to represent the forest and creatures who depend on the forest for survival. Display these pictures throughout the school to heighten awareness of the need to conserve and protect natural resources. – CON
GRADES
6-8
Science
Rainforest Pyramid
Use artistic talents to create blocks symbolizing rainforest creatures. Build a pyramid, putting the prey species such as insects at the bottom – building up until the top predators like the jaguar and harpy eagle are at the top. Show what happens when prey species are taken away – such as if insects are killed by pesticides, or small rodents are killed as pests. The same activity can be done for temperate forests of the Northwest as well, or any other particular ecosystem. —RC
Adopt a Part of Nature
Adopt part of a stream, creek, river, lake or ocean. Clean up the beaches or shores and spend time there as a class enjoying these special places.
Shorebird Safari
After introducing the class to common shorebirds and the field marks used to identify them, take your class to a beach. Shorebirds are visible year round, especially as the tide goes out. Students should try to identify special adaptations the birds have and predict the type of food they are seeking.
Social Studies
How Did They Do It?
Have students investigate the lifestyles of Native Americans on the prairie or along the coasts or in your local area. How were their needs met by these different environments?
Nature’s Tool Box
Pass out to individuals or small groups of students an assortment of simple tools: paper clips, sewing needle, letter opener, hair brush, straight pin, comb, and so on. Have students examine the tools carefully and decide what kinds of natural objects could be used or modified to make them. After students hike through an outdoor setting and collect materials, have them use the materials to make specific tools. —EGO
Mathematics
Graph the Tide
Purchase a tide table wherever fishing supplies are sold. Enlarge and photocopy each month’s chart on a separate page. Make enough copies so that each student will have one month to chart on graph paper. Post the papers in a line along the wall to see the rise and fall of the tide for the year. Teacher may want to designate a place on the paper for the base point (0.0).
Language Arts
Opposites Attract
Here is a thought-provoking idea: Collect photographs, illustrations and/or paintings from magazines — some that graphically portray a healthy, balanced environment and others that depict a damaged, unhealthy Earth. Hang these on opposite walls in the classroom to stimulate discussion and inspire writing. How does each set of images make students feel? Encourage them to think about how the healthy can be changed into the damaged and how they can help to change the damaged back into the healthy. As students learn about environmental problems and the solutions, they may go to the appropriate sides of the room to record their thoughts and ideas in two separate notebooks. For example, if a student is studying about an extinct animal, that student may record his/her concerns in a notebook located next to the unhealthy Earth artwork. If he/she knows of possible solutions and actions that can be done to help, they may be recorded on the other side of the room next to the healthy Earth artwork. Eventually, your class will have two useful notebooks filled with concerns and solutions to many environmental problems. Prioritize these and use your computer to record the top ten items that can be posted in the room for reference and distributed to family members. – TPE
Expectations
Students can write a paper that expresses their feelings about going to outdoor schooll. By knowing their anxieties, fears, and excitement, you may be able to better understand their individual needs. It is always fun for students to reread their own papers upon returning home. —JOD
Fine Arts
Touch of Color
While visiting a wooded area, pass out paper to the class and have each student, using natural materials (soil, berries, flowers, leaves, moss), draw a picture of the forest setting. Give the class an opportunity to display their work and describe their feelings about the surroundings. Encourage the students to discuss what materials were used to add color. —EGO
GRADES
9-12
Science
Symbiosis
Working with a partner, students research symbiotic relationships amongst intertidal and ocean organisms and choose one to report on. One example would be the anemone and the clownfish.
Human-created Habitats
Assign one water-dwelling animal to each student or team. Students then must design (on paper) an artificial habitat which would suite the living requirements of the animal. To do so, they must investigate and establish the characteristics of the animal’s natural habitat, including food, water, shelter, space, climate, etc. This assignment could be followed by creating models of artificial habitats.
Social Studies
Move Over!
To begin this activity, tell your class they are going to try an experiment dealing with classroom arrangements. Don’t mention the idea of overpopulation or limited resources. These concepts will surface as the outcome of the activity.
Select an area of the classroom to be used in this overpopulation experiment. an area approximately 10’x10’ should be marked with masking tape on the floor and two desks should be placed inside the area. Also provide a “Resources Box” with 4 pencils, 2 pens, 6 sheets of paper and 1 pair of scissors.
Select two volunteers to work in the square. They should take with them only the books they will need. One half hour later, select two more students to work in the square and add their desks to the other two. (Make sure to remove all “resource” from the desks first).
Continue to add students to the area in shorter intervals of time similar to the way population grows rapidly. When the area can no longer hold additional desks, add students and have them share desks. Make sure the tasks the children are involved in will require the use of resources in the “Resources Box.”
When the limited resources and overcrowded conditions lead to bedlam, bring the class together for discussion. How is this like the real world? What “resources” are in short supply? —LLC
Environmental Careers
Plan an Environmental Careers Day. Research various careers associated with the environment and invite people in to speak about their jobs. Try to get a variety of speakers to reflect the diversity of careers and educational requirements. Prepare an outline for the speakers to they will address the questions you are most interested in.
Both Sides Now
A forest management specialist, touring a watershed area, notes that in one part of the forest many diseased trees have fallen and are covering the ground. This is a serious fire hazard for the forest. The specialist recommends logging this area and replanting with young, healthy seedlings. A concerned citizen’s group protests the logging, saying that clearcutting the area will erode the soil, which will make our drinking water unclean.
Your group has been asked to list the pros and cons of logging that area of the watershed. Consider the environmental, economic and social arguments. Can you find a compromise to the problem? How do personal opinions affect your decision? —FSS
Litter Lifelines
Students collect litter in an outdoor setting — school parking lot, playground, camp, or business district. Then each student selects a piece of trash – soda can, chewing gum wrapper, potato chip bag —and makes a life line of the litter, from the origin of its natural materials to its present state. — TGP
Mathematics
Food Chain Figuring
Use the following information to create math problems. A medium-sized whale needs four hundred billion diatoms to sustain it for a few hours! The whale eats a ton of herring, about 5,000 of them. Each herring may have about 6,500 small crustaceans in its stomach, and each crustacean may contain 130,000 diatoms…
Language Arts
Forest Essay
Have students write an imaginary story using one of the following titles: a) The Life of a Pencil; b)An Autobiography of a Tree from Seed to Lumber.
Legends of the Sea
Many cultures have legends about the way the ocean and its life forms were created. Read some of these to the class, then encourage them to create their own legends about how somethings came to be. It would be helpful to have some pictures of marine life forms for the students to view. Some ideas: How the Eel Became Electric; Why Octopi Have Only Eight Arms; Before Whales could Swim; How the Hermit Crab Lost His Shell.
Fine Arts
Mother Earth
Students begin by brainstorming a list of all the ways they are dependent on the Earth. From that list should come some ideas for presenting that information to others. They may decide to have teams of students work on representing different items on the list. They may want to expres their relationship to the land written in story format, in poetry, verbally on tape, through photographs, drawings, paintings, or soft sculpture. They should come up with a theme uch as Native American philosophy, or a celebration of life-giving qualities of the Earth, or getting involved with conservation, and work from there. Ask for volunteers to write letters to local organizations requesting space to set up their display for others to view.
Encourage your students to express their feelings about our responsibility to live in harmony with the land. Is it our responsibility? Can the actions of one person make a difference? What kinds of actions does living in harmony with the Earth require? —LLC
Sources of activities:
CCN — Carrying Capacity Network Clearinghouse Bulletin, June 1992.
KT — Kind Teacher, Natl. Association for Humane and Environmental Education
IEEIC — Inegrating Environmental Education Into the Curriculum… Painlessly. National Educational Service, 1992.
RC — Rainforest Conservation, Rainforest Awareness Info. Network, 1992.
ECO — Eco-Acts: A Manual of Ecological Activities, Phyllis Ford, ed.
JOD — Just Open the Door, by Rich Gerston, Interstate Printers and Publishers, 1983.
LLC — Living Lightly in the City, Schlitz Audubon Center, 1984.
EGO- Education Goes Outdoors, Addison-Wesley 1986.
CON – Connections: Life Cycle Kinesthetic Learning. The Energy Office, Grand Junction, CO 1993.
CTE – Consider the Earth by Julie M. Gates, Teacher Ideas Press, 1989.
FSS – From Source to Sea, Greater Vancouver Regional District 1993.
GGC – Growing Greener Cities and Environmental Education Guide
American Forests, Washington DC 1992
LCA – Let’s Clean the Air, Greater Vancouver Regional District 1993.
NTW – No Time to Waste, Greater Vancouver Regional District 1993.
TPE – The Private Eye, Kerry Ruef, The Private Eye Project, Seattle, 1992.

by editor | Sep 1, 2025 | At-risk Youth, Critical Thinking, Experiential Learning, K-12 Activities, Schoolyard Classroom
by Abigail Harding and Corwyn Ellison
“We do not learn from experience, we learn from reflecting on experience.”
-—John Dewey
When we walk silently in the forest we allow ourselves to deepen our connection and strengthen our appreciation for the natural world. Suddenly, we hear animals unfamiliar to us, and observe natural phenomena we never stopped to notice. Exposure to the natural world and reflection is beneficial to physical and mental well-being. The psychological power of a reflective solo walk is astounding—so much so that conscious reflective thought has been shown to change the very structure of our brains.1 Experience-based learning is more powerful when coupled with reflection. Reflection is defined as an intentional effort to observe, synthesize, abstract and articulate the key learnings gathered from an experience.2 When implemented intentionally, solo walks provide a context in which both experiential education and mindfulness converge for the benefit of student learning.
A solo walk is a relatively simple concept: an individual walks alone on a trail or perhaps through the neighborhood to connect, reflect or reason through an event, emotions, or anything else that comes up during that time. It is not novel, but can be revolutionary for the individual participating in it. Using solo walks to introduce observation and reflections skills to students is not only effective in learning, but also important in connecting with themselves, the community, and the environment. In this article we will provide a framework for conducting solo walks with students in natural settings.
What is a solo walk?
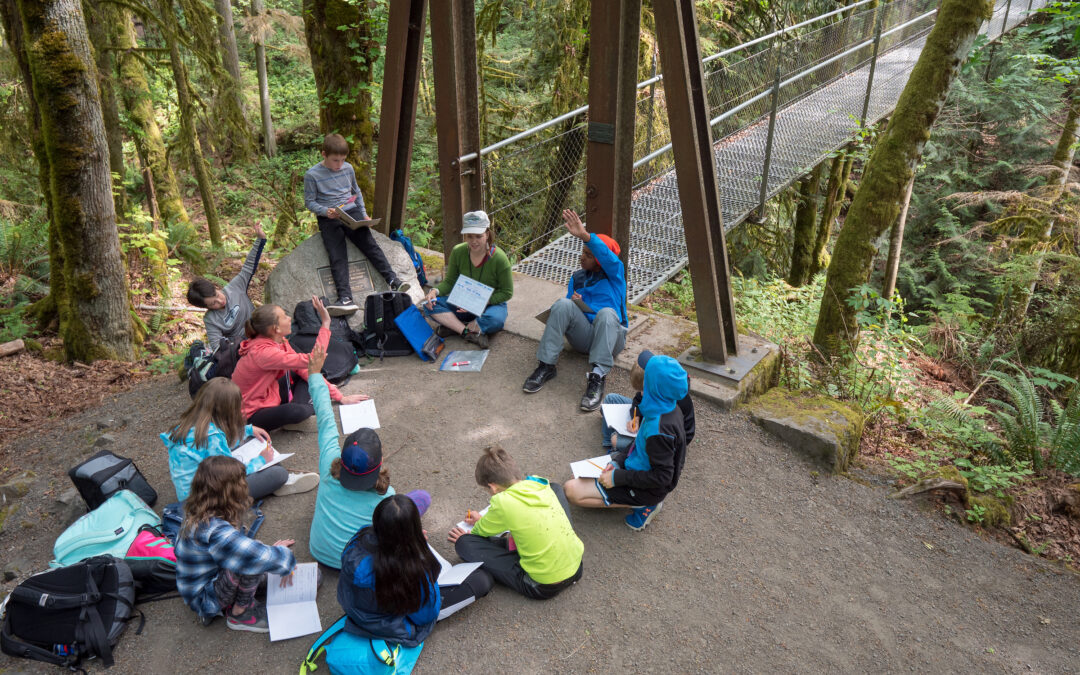
A solo walk is an independent, thought-provoking walk through a relatively isolated area. A key goal of a solo walk is to practice observational skills and promote critical thinking, and introspective thought in students. This is accomplished through both the solo walk itself, and reflective journaling and debriefing after. During the walk students are guided both in their direction on the trail and mindful awareness by cards spaced ten to twenty feet apart on the ground. The cards may include a topical quote, a prompt for journaling or action, a direction, or perhaps a question to ponder. These cards can be customized and adjusted to suit the needs of the students and to meet learning goals. Common categories for cards include introduction/closing, thought-provoking questions/quotes, observation/sensory prompts, directional signs, and anything in between. For example, a card may say, “Stop here until you hear two bird songs” or “Where was this boulder 100 years ago? 1,000 years ago?”
How do you do a solo walk?
A non-complex trail or route should be chosen ahead of time. To avoid confusion, a card indicating direction of travel should be placed at all junctions the students encounter during their walk. A typical trail length is approximately ¼ mile. Two instructors or adults are necessary for the solo walk. The process and implementation should be discussed ahead of time. Students begin by gathering at the head of the route. Instructor A will introduce the solo walk as a reflective activity and play a game with the students as they wait to begin their solo walk. Be clear to students about expectations, the benefits of doing a solo walk, and why it is important for them to walk slowly and silently throughout. Emphasize that if they see someone in front of them, they should slow down, perhaps spend more time at the current card, and give the person ahead time to walk out of sight.
After roll-out, Instructor B leaves to set out the cards on the trail. Approximately five to ten minutes later, instructor A begins sending one student at a time down the trail for the solo walk. Each student is sent down the trail in two-minute intervals. The order in which they are sent can be determined ahead of time by the instructors or the decision can be student-directed.
At the end of the solo walk, Instructor A will be waiting in an area in which students may silently sit and journal reflectively about their experience. This location should be large enough for the entire group and should be comfortable for students. After all students have returned and journaled, Instructor B will walk the trail, pick up the cards, and rejoin the group. At this point a debrief will occur. Since students will be arriving to the end location at different times, it is important to have an activity ready for them to complete while they wait. This could be journaling, drawing or using watercolors to illustrate something they noticed during the walk, sitting quietly and observing, or any other quiet independent activity.
The debrief
Debrief is one of the most important components of a solo walk, particularly when it is focused on reflecting, synthesizing, and sharing their experience. Responding to one to two pre-written questions in a journal while students wait for the rest of the group is a constructive activity that prepares them for sharing later. To accommodate different learning styles, offer students a choice of responding in a way that feels valuable to them i.e. writing, sketching, or a combination. Once all students have completed the walk and journaling, give them an opportunity to share in pairs and/or as a group. The act of sharing their experiences can be very powerful, but also recognize that not all students will want to share to a large group and, in those cases, sharing with one other person is sufficient.
Some examples of debrief questions can include:
What surprised you about this experience?
What was your favorite card? What cards would you include?
What advice would you give other students for their solo walk experience?
What are two things you learned and can use in daily life?
Use a mix of questioning strategies to draw out student reflection, and be clear about discussion norms to ensure emotional safety during a group debrief. Using the solo walk cards again for debrief is an effective way to provoke group discussion. Solo walk cards can be placed in a pile on the ground, students can then pick their favorite card and share with the group why this card was chosen. Similarly, cards with a variety of emotions written on them may be used to promote a deeper discussion about feelings.
Table 1. The solo walk implementation guide
Goal To practice reflection, critical thinking, introspective thought, and scientific observation skills.
Objective Students will be able to:
· Journal in a reflective manner
· Complete a solo walk in an isolated area
· Participate in group discussion in a meaningful way
Audience Age group: any age
Number of individuals: 10-15
Duration How long is the lesson? 60 minutes
How long will it take to follow up the field experience? 10-20 minutes for debrief
Location An appropriate trail route and length based on the group’s abilities and needs. Check location ahead of time to identify potential risks. Alternative options include: school hallways, or any green space that provides opportunity for solitude.
Management and safety Students are supervised at beginning and end of trail. Trail is appropriate in level of difficulty and complexity. Junctions are marked with clear directional signs. Emotional safety is addressed by partner walking or pairing a child with an adult.
Equipment · Prompt cards (25-50)
· Activity for before and after solo walk
· Writing utensils
· Student journals
The debrief activities are an excellent opportunity for both teachers and students to assess student experience, knowledge and insight resulting from a solo walk. This information can be used to guide future learning activities and goal setting.
Teaching applications
Solo walks as a tool
For teachers, a solo walk is a versatile tool that can be planned to meet a variety of learning objectives. How you frame the activity, when you conduct it, what cards you choose, the order in which they appear on the trail, and the debrief strategy are all opportunities to guide students towards a specific goal or outcome. For example, a solo walk can be used:
In the beginning of a week to introduce students to and help them connect with a new setting
To ground a group of individuals with mindful awareness and space for reflection
At the end of a week so students can reflect on all that they have accomplished and how they might transfer these skills to their daily lives
Before and/or after a team building activity
Solo Science
In science education settings, students are often bombarded with new techniques and terminology. Solo walks provide the solitude necessary for students to ponder, dissect, and make sense of complex concepts in a tangible way. Because solo walks are inherently independent, students can use scientific tools without any external influence, and think critically of the world around them without fear of failure. Instructors may choose an investigative topic to center the solo walk around or design a mini independent investigation to be conducted during the solo walk. For example, an investigative topic may be plant and animal adaptations. The pictures below are examples of how we have woven scientific practice into the solo walk experience.
Connecting to classroom and beyond
Solo walks offer an incredible opportunity for students to develop awareness and practice active reflection that is an essential and valuable tool in lifelong learning. It can be a transformative experience and its adaptability make it a valuable tool for teachers. Give your students ownership over their experience by having them create their own solo walk cards. Cards can be written in any language, made of recycled material, cut into shapes, etc. Get creative and make it work for you and your students!
Advice from the field
Here are some tips gathered from a survey of 39 outdoor educational professionals with experience facilitating solo walks:
• Keep objectives broad, learners will get different things from the experience. The learning goal can be as simple as having time alone in the woods and it will still be powerful.
• Utilize a variety of cards and consider how the cards you use will support a larger theme or create a desired experience or outcome. Use short, relatable quotes from a diverse group of people with different backgrounds and cultures.
• Check the trail ahead of time and bring a few extra cards and markers to take advantage of teachable moments. Let the trail speak to you. If it is windy, use rocks to weigh the cards down and if you are teaching in a place like the Pacific Northwest, make sure your cards will survive the rain.
For some students, walking alone in the woods can create anxiety or bring out behavioral challenges. Work with students on ways to help them feel safe and explain that it can be a challenge by choice. You can help by sharing your own experience with solo walks, pairing students together or with an adult, being intentional with the line order, giving directions silently, etc.
Have fun and get creative!
References
Kolb, David A. (2014). Experiential learning: Experience as the Source of Learning and Development. Case Western Reserve University. Prentice Hall PTR, Englewood Cliffs, New Jersey
Giada Di Stefano, Francesca Gino, Gary Pisano & Bradley Staats. March 2014. Learning by Thinking: How Reflection Improves Performance. Harvard Business School Working Knowledge. Retrieved from https://hbswk.hbs.edu/item/learning-by-thinking-how-reflection-improves-performance.
Wilson, Donna & Conyers, Marcus. (2013). Five Big Ideas for Effective Teaching: connecting mind, brain, and education research to classroom practice. New York, NY: Teachers College Press.
Zelazo, P. (2015). Executive function: Reflection, iterative reprocessing, complexity, and the developing brain. Developmental Review. Volume 38, 55-68.
 Abigail M. Harding and Corwyn A. Ellison are environmental educators and graduate students at IslandWood and the University of Washington.
by editor | Sep 1, 2025 | Equity and Inclusion, K-12 Activities
AGES: 13 –18+ years old
CONTRIBUTED BY
Center for Cities + Schools University of California, Berkeley
y-plan.berkeley.edu
What does resilience mean to you? Psychologists, ecologists, and economists, cities, schools and businesses, and individuals all over the world have developed their own definitions. Increasingly, these once disparate uses of resilience are converging into a cohesive system; ultimately shaping the society our children will inherit. This lesson allows adults to work toward a new, comprehensive understanding of the term resilience for and with young people.
MATERIALS
• Pen, paper, and clipboard for each student
DIRECTIONS
Take students on a tour through the school and its grounds. As you walk, ask them to list evidence of “resilience” or lack of resilience. This evidence could be about the physical space, the school community, or even themselves.
Sample prompts for students include:
Physical
“Are there recent improvements to buildings or grounds that you see? Are there murals or student work in the halls? Things that used to be broken? Things that have been broken for too long?”
Social
“Whether and how do clubs or groups at your school support students or overcome issues at the school? Does Student Council improve the school? If so, how? What sports teams or clubs create a supportive environment for members?”
Personal
“Does walking through the lunch room or a particular spot on the yard remind you of a time you or a peer were able to overcome a bully? Does walking past an old classroom remind you of failing a test? Did you improve your grades? Do you have friends at school who support you?”
End your tour outside the school, and discuss what students have noted as physical, social, and personal resilience. Are there particular spaces that they see as more or less resilient, or make them feel personally more or less resilient? Now focus on the outdoor space. Let students go to their favorite part of the grounds. While they are there, they should list evidence of resilience and lack of resilience. Is the grass beaten back into a natural trail? Are tree roots breaking a concrete path? What plants, animals, or insects are here, and how well are they thriving? Is a creek allowed to run through the property or is it underground? What evidence of resilience do you see in the natural world around you? What impact are people having on it? Note examples of both resilience and things that are not resilient.
Bring students back together. Ask if they think their school is resilient? How could it be more resilient? Allow time for a discussion. Finish by asking each student to write a working definition of resilience that includes the factors they saw today.
by editor | Sep 1, 2025 | K-12 Activities
GRADES
K-2
Science
Garbage Gardens
Have students bring in an egg carton and empty halved egg shells from six eggs. Pierce the bottom of the egg shells and fill them with composted soil. Place the egg shells in the egg carton to keep upright. Plant various types of seeds in the egg shells. Make sure to label each student’s egg carton with their names and the types of seeds they planted. Extend the learning by creating experiments dealing with the effects of natural environmental variations such as light and water as well as “artificial” variations including the application of household hazardous wastes found in the classroom (check out areas around your sink for these products).
Social Studies
Nautical Neighbors
If there is a marina area, take the class on a tour of it. Arrange a tour of a fishing boat, and have the skipper explain all the different equipment and the variety of jobs aboard the craft.
Getting Down to Basics
List all the items below on the chalkboard. Then ask students, one at a time, to erase something that could harm the environment.
Beds, foam cups, what, war, polio shots, oil, atom bomb, pine trees, friends, sneakers, car, hairspray, vegetables, television, plastics, hamburgers, gold, food coloring, love, lawnmower, oxygen, zippers, flowers, aspirin, rockets, ice cream, water, candy bar, computers, grass, chemical fertilizers, jets, school, mosquitoes, boom boxes.
Add to this list. Have students explain their reasoning.
Mathematics
Whale Milk Math
A newborn blue whale gains 200 lbs per day (9 lbs. per hour) by drinking up to 50 gallons of milk each day. In one day, a blue whale calf would drink the amount of milk in 800 school-sized milk cartons! Have students rinse and save milk cartons each day. Count the new ones daily and add the total to the previous day’s total until you reach 800.
How Big Is It?
To estimate the height of an animal at its shoulder, multiply the length of the foretrack by 8. To estimate the weight, multiply the width of the foretrack in inches by its length in inches. Multipy the product by 5 to get the approximate weight in pounds. These measurements can be checked by using people and pets (mammals).
Language Arts
What Do You See?
Students view several pictures of beach/ocean wildlife, then choose one to study. After examining closely, each student writes a description of his/her animal. Later, teacher reads written description and class guesses which animal picture it was based on.
Finding Adjectives
Give each child a small piece of paper with one or more adjectives that describe something in nature (e.g., smooth, slimy, triangular, expanded, cool, soft and green, round and gooey). Have students explore a natural area to find items that meet these descriptions. Let students take turns sharing what they found.
GRADES
3-5
Science
Living in the Schoolyard
Teacher begins activity by drawing an outline of the classroom on the blackboard. Develop a key to one side of the outline to be used to represent the plants, animals and special features which exist in the classroom. “Let’s see if we can make a map of all the living things in our classroom. Does anyone see a plant? Skippy, will you come up and mark the plants on our map for us?
Then provide a map of the schoolyard for groups of students (or for individual students depending on skills at map making). Take children outside and let them map all the living things that they see. Remind them that they have to look hard to see some of the things that are there.
After students have completed their maps, gather them together for discussion about the roles of the living things they found.
Social Studies
Pick a Package, Any Package
Visit a supermarket and find the following products: cereal, laundry soap, milk, fruit juice, vegetables, soup, cake mixes, spices, candy, and toothpaste. In what different kinds of packages can they be bought? Are they available in the bulk food section? Why are products available in so many different packages? Which packages have the least amount of throw-away packaging? Which packages cost the least for each product? Which one does your family usually buy? Back in class, make a wall chart. Can some of the packages be reduced or avoided, reused or recycled? Circle in green all the reusable items, in yellow all the recyclable items, and in red all the disposables.
Mathematics
Milk Carton Madness
In an attempt to determine how much potential space milk cartons take up in a landfill, students measure and calculate the volume of one milk carton. Students also determine the volume of their classroom. Using the milk carton volume figures, have the students determine how many cartons it would take to fill up their classroom. Then determine how many milk cartons are generated by the entire school in one day. Determine how long it would take to fill up their classroom. Extend these computations to a volume the size of the school. Follow this by discussing the importance of diversion of materials from the landfill and by exploring the feasibility of milk carton recycling at your school.
Language Arts
Depend on Your Ears
Take a let’s-depend-entirely-on-our-ears field trip to the school grounds. How many things can the class identify? Why do they hear more things with their eyes closed than when they are open? Besides naming the sound makers, can they locate the direction of the sound? Is the sound maker moving? Is the sound pleasant or unpleasant?
Fine Arts
Wetlands Animal Masks
Students can create paper mache masks of their favorite wetlands creatures. Creative dramatics can be developed by students using their masks to play a role in a wetlands drama.
Students will need old newspapers, wallpaper paste or liquid starch, water, tempera or acrylic paint, round balloons, and scissors.
Choose a wetlands animal. Tear the newspaper into narrow strips. Blow up the balloon. Mix the wallpaper paste. Use one part wallpaper paste and 10 parts water or straight liquid starch.
Dip the strips of newspaper into the wallpaper and water mixture. Lay the paper over the balloon. Apply two layers to what will be the front of your mask. Let it dry completely.
Repeat procedure, building up the areas that will be noses, beaks, ears, etc. Let it dry completely.
Repeat the procedure, applying one last coat of paper over the entire mask. Let it dry completely.
Put the mask over your face. Feel where your eyes are. Have a friend mark the eye gently with a crayon or marker. Remove the mask and cut eyeholes. Put the mask over your face and check the eyeholes; remove it and make any corrections.
Cut a mouth hole.
Paint the mask and let it dry.
GRADES
6-8
Science
Birds of a Feather
Have students keep a record for one week of how many birds they see on the way to school. Numbers can be recorded: varieties can be noted and even an attempt to identify them. This will develop powers of observation and will stress the understanding that there is more wildlife around us than we realize.
Social Studies
Travel Log
Design a travel log to show the travelling you do for two weeks. Include the date, where you went, how you travelled, who went with you, how long it took and how many kilometres you travelled round trip. After two weeks, add up how many trips you took by car, transit, bicycle, foot, taxi or other modes. How many kilometres did you travel all together? Which transportation mode is the fastest? The cheapest? Which is you preferred transportation mode for each type of trip? Why?
Now analyze your information and make suggestions as to how you could have reduced the number of trips you made. How many times could you have used transportation other than a car? Compare your results with those of your friends. —LCA
Mathematics
Alive with Bugs
Forest soils are alive with tiny soil animals such as mites and earthworms. Studies in mountain country indicate that as many as 9,936 may be found in one square foot of forest litter 2 inches in depth). How many per square inch? Yard? Acre? Discussion: What do they do there? Are they necessary an valuable?
Water Watching
The purpose of this activity is for students to realize that people use huge amounts of water every day an to appreciate more fully the problems associated with providing adequate water supply to large metropolitan areas.
Involve students in calculating the amount of water used daily in their 1) home, b) community, c) state and d) the US or Canada. Selected individuals or small groups might investigate through interviews with key personnel the availability (present and future) of water in the community. Finally discuss the findings with the entire class to determine what they might mean to individuals, industry, government or other groups.
Language Arts
What’s the Idea?
Encourage students to be on the lookout for environmental articles in their magazine. Once they begin coming in, select one and duplicate as many as needed.
Distribute copies to students.
Instruct the students to read the selection very carefully. On a clean sheet of paper, or index card, they are to write the following:
• the main idea
• the problem
• a solution
• their personal opinion
• a summary (approximately eight sentences)
On the back they are to compose and write three quality questions with answers regarding the selection; one true-false, one multiple choice, and one fill-in-the-blank.
Collect papers and compose a comprehension quiz to distribute the next day, or perhaps create a game with which to exercise learned facts. — IEEIC
Fine Arts
Food Chain Mobiles
Create mobiles of food chains for various species of wildlife. Each class member can make one of a different species. The animals, plants, and other parts may be cut from magazines and posted on cardboard or they can be original artwork. Pieces of plant materials, hides, bones, feathers, could be included. Be sure that each mobile shows a food chain for a single animal. Or, one very large mobile might be made up with several animals ( mammal, birds, fish, etc.) showing the interrelationships. Color could be used to code this relationship. Would this be a food web?
Murals
Murals can be used to show various aspects of the environment. They can illustrate plants and animals of a particular biome as consumers and producers. They are an effective means to show food webs. A mural can also depict a scene of your neightborhood before the imigration of Europeans, for example, or future land use.
GRADES
9-12
Science
Mapping a Watershed
Locate a local stream or river on a map, making sure that your map includes the entire watershed. Select a spot on the map as far downstream as possible for your starting point. Next, locate the upstream ends of all channels that flow into your river above that point. Trace the section of your watershed onto paper (lor draw directly on the map), drawing all of the branches or tributaries of your stream or river. Draw the other significant natural features, and major land uses (industry, agriculture, residential neighborhoods). Discuss some of the following questions with the class: Where does the water in your watershed come from? Are the streams and rivers in the watershed present year round? What are some of the major land uses? How do these uses effect the river?
— from Investigating Streams and Rivers (GREEN)
What Eats?
For one game, divide the group into teams, with no more than 10 persons on a team. Now write a column of numbers one to 10 in three widely separated places in the room. Each team has a pice of chalk or marking device.
At a signal, the first person on each team dashes to the column of numbers and writes the name of a plant or an animal opposite the number “1”. Then he dashes back and gives the marker to the second person on his team. This person goes to the column and writes the name of something that eats what is written in number “1”. The marker is then passed to the third person, and so on down the line.
If a player writes down an incorrect name, it can be erased only by the next player, who loses his turn to write a name. Winners are determined by the most correct food-chain connections identified by a group.
Once a group has developed some skill at playing, try limiting the habitat to that of the forest, a brook, a marsh, a pond, the ocean, or some biome or community.
Stepping Into Others’ Shoes
Present two sides of a current environmental issue to the class. Have the students write one letter stating their personal opinions about the issue and why they feel that way. Then have them write a second letter from another perspective. Discuss what students learned and insights that were gained.
— GREEN Cross Cultural Partners Activity Manual
Piecing Together Your Watershed
Laminate a copy of your watershed map, then cut into jigsaw puzzle-like pieces The number of pieces will be determined by the number of student learning groups formed by students working in groups of two or three. Give each group of students one piece of the map puzzle and a large piece of butcher paper with colored pencils and markers. Have the students reproduce/enlarge their section of the basin map (each inch of the puzzle could be enlarged to as much as 6 inches on the butcher paper). Have the students include all features (roads, towns, tributaries, railroads, etc.) Have each student present their enlargement to the entire class, describing its location and features. Have the other students try and locate the section being talked about on the basin map. Challenge them to identify it by using the map’s marginal coordinates.
Using tape, assemble the new large scale map. Have students create a key for their map featuring symbols and scale. Hang it on a wall in the school with a project banner hanging over the map to identify the class that worked on the project.
— Activity from “The Living River: An Educator’s Guide to the Nisqually River Basin.”
Social Studies
Regulatory Agencies
The students should in groups choose a regulatory agency to investigate. Through library research, determine the laws, standards, enforcement, and penalties for which water resource agencies are responsible. Obtain the address and phone number of a regulatory agency’s nearest office and the name of someone to contact concerning its water resources work.
Have the students take the role of the lawmakers and write five regulations to protect water quality or public health and safety associated with water resources. Have the group discuss some of the following questions: What are the names and responsibilities of the international, national, regional and local agencies with primary resource responsibilities? Why are regulations necessary? What measures other than regulations may be used to maintain the health and safety of water resources? What are some difficulties encountered by water resources staff in creating and enforcing regulations?
Have the students make an appointment with agency staff members to present questions or observations. Invite the agency representative to come to the class to address the questions.
— Adapted from Aspen Global Change GREEN Cross Culturall Partners Activity Manual
Environmental Impact
Create a large mural on butcher paper of a natural area complete with wildlife, trees, mountains, rivers, etc. but no human development. After completing the mural, brainstorm a list of things that would happen if a much needed energy source (e.g., coal, oil, uranium, water) was discovered in that area. Draw pictures of these activities and facilities and place them in appropriate places on the mural. Discuss the positive and negative impacts the “new development” will have on the environment and wildlife, and create a list of these effects. Now, re-develop the energy source and see if you can come up with ways that the development can have less impact on the environment and still get the energy needed, at an affordable cost.
Mathematics
Differential Absorption
Types of soils differ in the amount of water they can hold. Collect a standard amount of each of five or six soil types. Place each soil sample in a sieve held above a container. Pour a measured amount of water onto the soil and measure how much is collected after 30 seconds, one minute, 10 minutes. The amount of water the soil can hold is total added, minus that which drained out at the bottom.
From the data obtained, determine which of the soils can hold the most or the least water. On what properties of the soil does this depend? Which soils would erode most easily? Which would be best for plant growth?
Language Arts
Operation: Water
Invite the participants to imagine that they have landed on Earth from another planet. The planet they come from only has minerals and air. They had received word that a substance had been found on Earth that could move or hold its shape. They are here to see if the report is true and discover for themselves what this “water” is like. They are equipped with finely tuned instruments for sound, feel, sight, smell, and taste. They are to split into two search parties, one going to the pond area, one to the stream. They have 15 minute to gather sounds, smells, signs of animal and plant life, observe water clarity, etc. The groups then discuss and compare the two water sightings and make speculations about the role of water on this green planet. Have students write an essay on their exploration of this strange planet and the miracle substance “water.”
Fine Arts
Environmental Art
Visit a natural history museum. Or, have students look through books with photographs of paintings depicting the environment. They may analyze, discuss, compare, contrast art works and give critiques. Pupils may be inspired to write poems or stories about ideas generated from the special works and they may then create their own works of art.
by editor | Mar 18, 2024 | Environmental Literacy, K-12 Activities, Learning Theory
by Allison Breeze
 s an educator, I believe that learning happens when students are applying their knowledge in practice. To this end, I am always looking for activities that engage students in hands-on ways with whatever topic they are learning about. Exploration and experience can provide immensely beneficial learning opportunities for students that give them context to process information. For this to work effectively, students must be positioned in such a way that allows them to take action, and the instructor must be willing to take a step back from holding control over the learning. One effective method for structuring such an environment is stations.
In stations-based activities, students are asked to complete a task in a certain location, and then repeatedly move to a new location to complete a different task, until they have visited all the locations, or within a specific timeframe. Oftentimes, there will be a rotation to allow for multiple students to experience different stations simultaneously. Stations offer the structure of spatial and task-based boundaries to keep students safe, while providing the opportunity for them to have agency and independence in completing the assigned task. Additionally, stations can be done individually or in small groups, to either allow students some independent processing time, or as a way to foster collaboration.
Instructors can often set up the stations ahead of time so that they don’t have to give as many directions to introduce an activity. This way, students are spending most of their time actually engaged in the learning, as opposed to waiting for it to begin. This also means that instructors can feel less rushed and give students the space they need to be successful.
Stations often set students up to be more independent than teacher-led instruction. For some students, this agency is very natural to their preferred structure for learning and helps them express themselves more easily. For other students, this independence requires them to engage in productive struggle to figure out the task and collaborate with their peers rather than relying on the teacher for help. In both situations, the stations model is promoting student growth by offering another mode for learning and asking students to try something new.
Stations in Practice:
I find stations to be an effective structure in which to conduct investigations with my students. It helps data collection happen faster, it means students are less likely to be left waiting with nothing to do, and it requires students to independently make connections between their actions and the overarching inquiry that is being investigated.
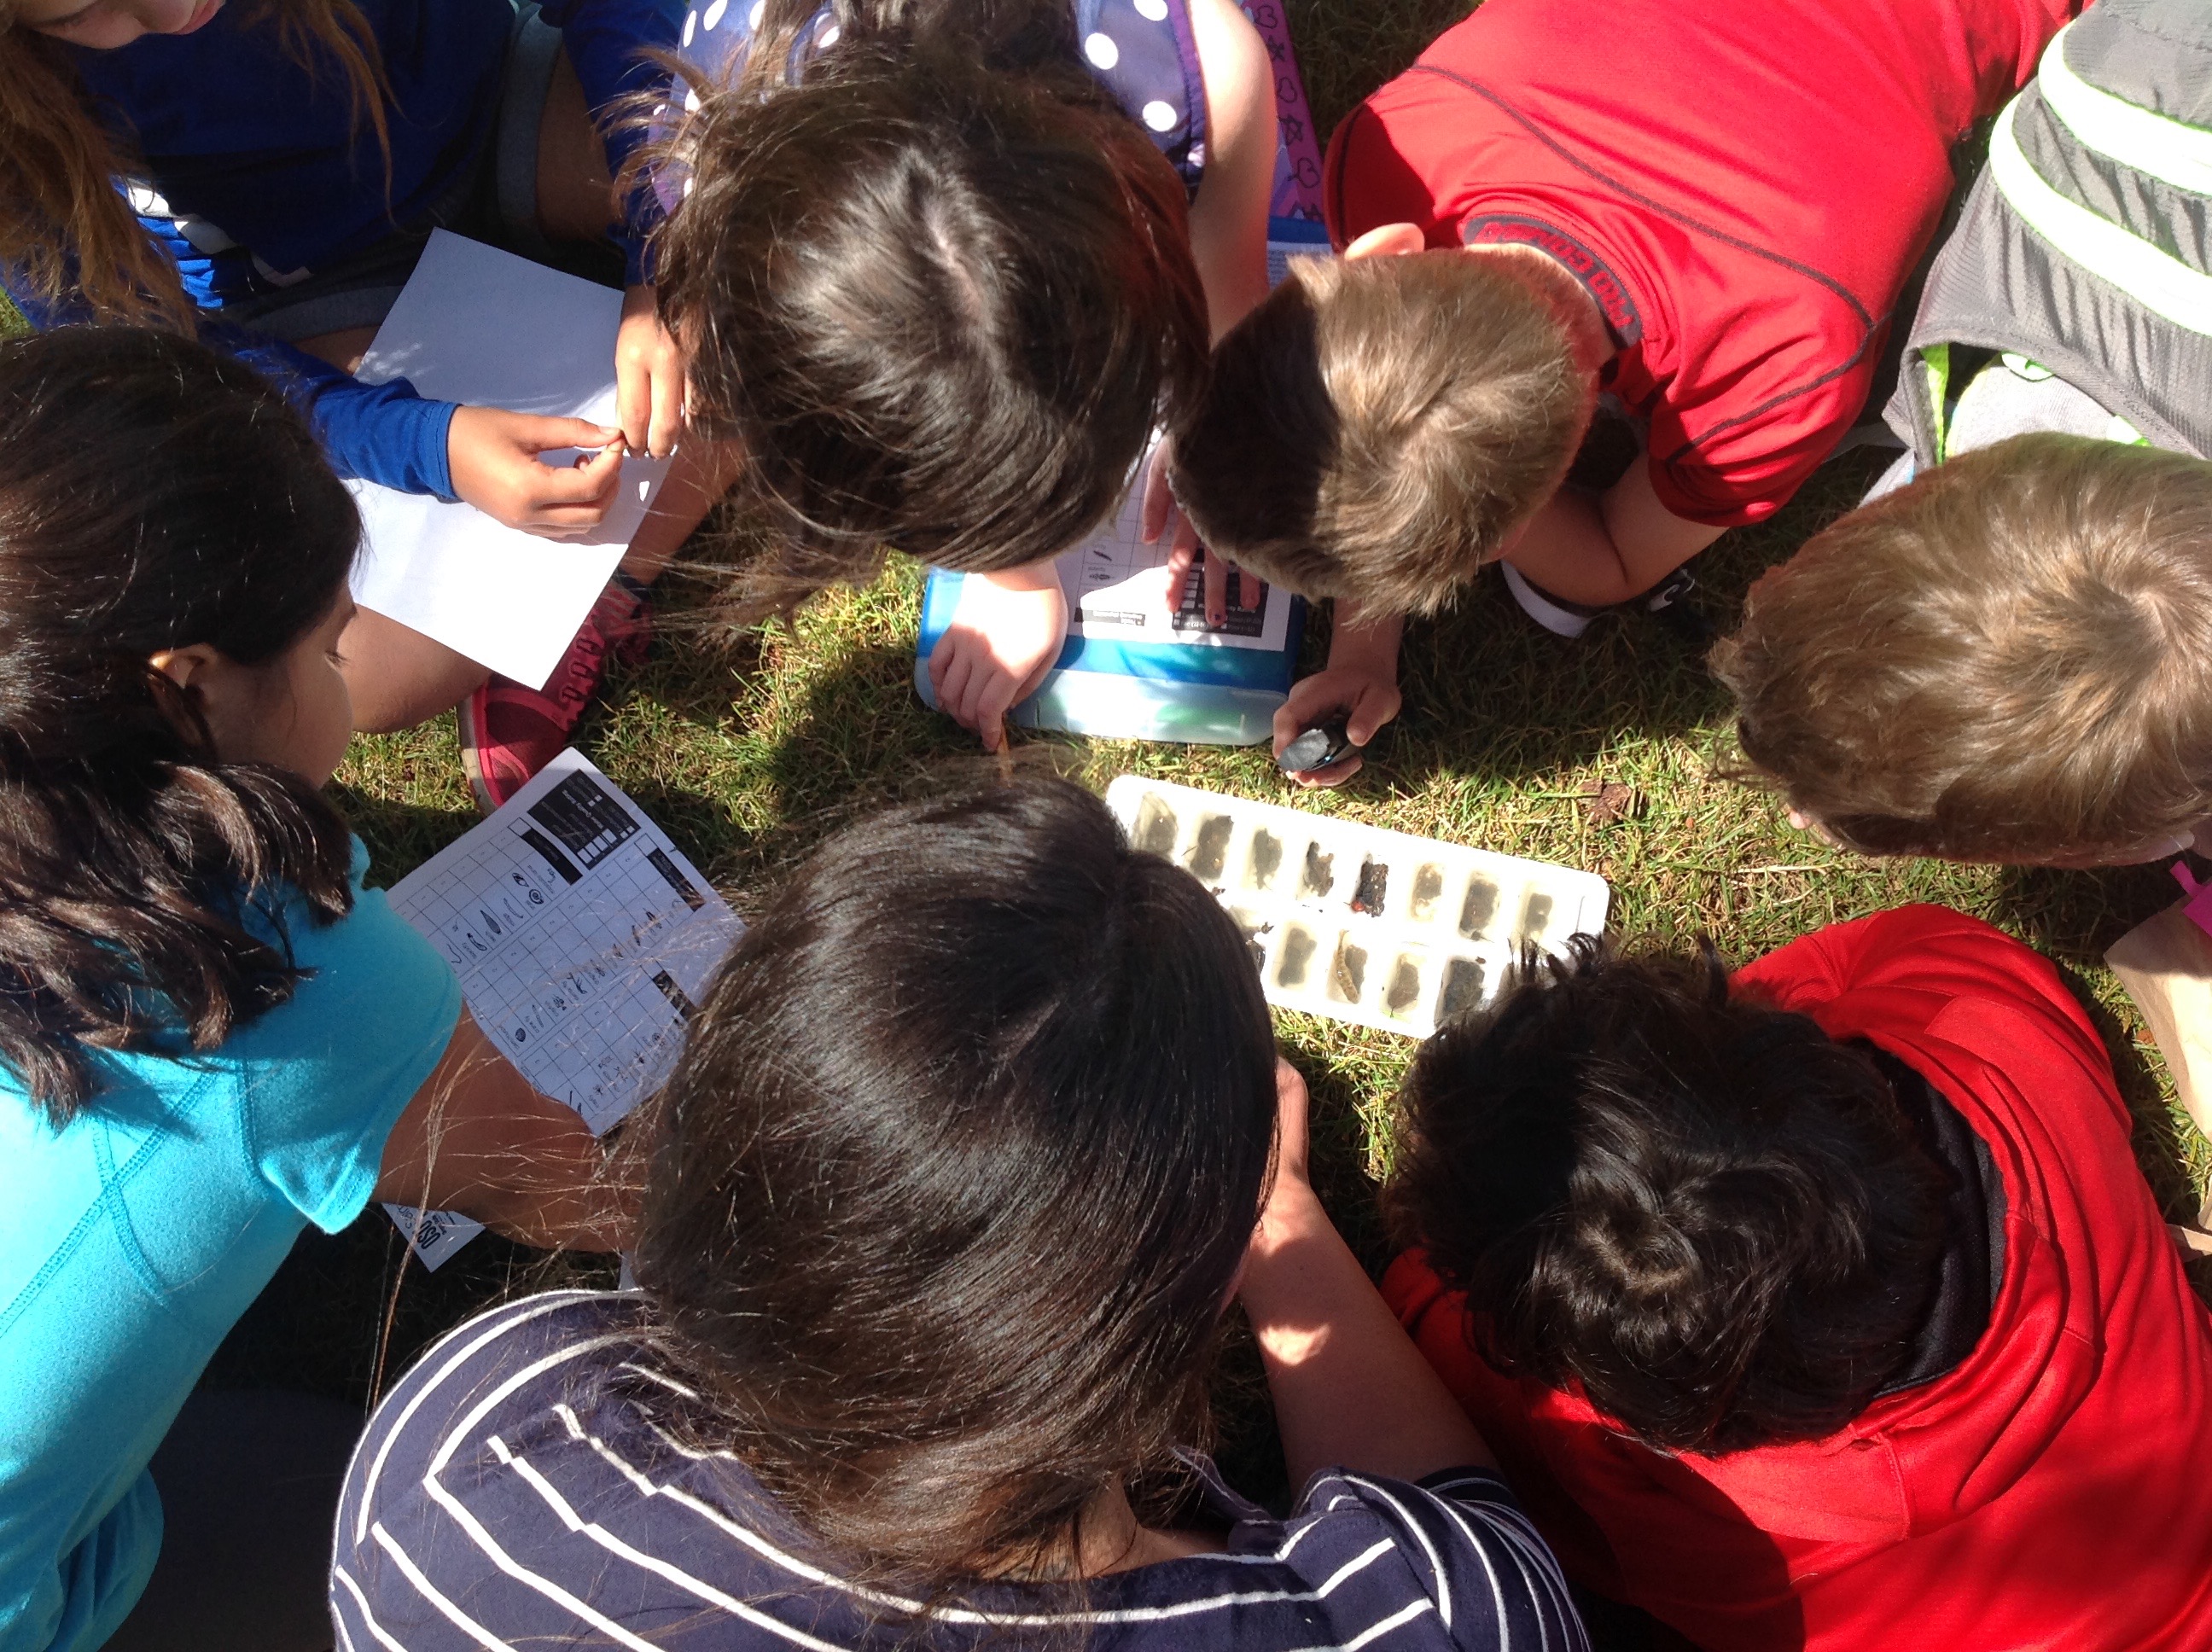
One such example investigation I have done with students focuses on the different ways that decomposition occurs in compost. At IslandWood, we have three types of compost bins: an EarthFlow that uses mechanical and bacterial decomposition, a high-volume vermicompost that uses worms and other macroinvertebrates, and a garden compost that uses macroinvertebrates and special fiber mats for insulation. In the investigation, students form three groups that rotate between each compost bin and collect data about each bin — temperature, soil color, material, number and type of macroinvertebrates — to understand how natural material breaks down into nutrient-rich soil in different ways. Each compost station has a set of directions and tools available, and every student has a journal with a data table to record their observations. At the end of the data collection, all students come together to synthesize their information as a whole group and debrief what they learned during the activity.
In this activity, I find that using stations can make scientific inquiry more accessible to students, because it offers many entry points to engaging with the material. It also allows me more time as an instructor to check in with specific students. I make sure to include multiple ways of recording data, such as numerically, through written expression, verbalization, and drawing, to ensure that all students have a way of participating. I have also found that students are more willing to challenge themselves if they are engaged in peer-to-peer interactions while learning, which the stations format allows for better than lecture or instructor-modeled kinesthesis. If a student who is concerned about touching bugs sees a friend holding a worm, they might be more inclined to try touching it, because they can see that behavior being modeled with safe and comfortable consequences.
Overall, I have seen stations as a great way to help students experience more agency and collaboration within an intentional environment set up by the instructor. Using stations can be a nice break from a traditional activity format that provides a balance between flexibility and structure to prioritize student engagement.
Lesson Plan:
Overview:
Students will collect data at three different compost bins to compare and contrast the ways that decomposition happens at each. They will record and synthesize the data they find and draw conclusions.
Background:
Students are in an outdoor educational setting with three compost systems. They have been introduced to the concept of producers, consumers, and decomposers in a food web. They are curious about the differences between the three compost systems.
Outcomes:
● Students will understand the role of compost in a food web
● Students will be able to give examples of how decomposition occurs
● Students will know how to collect data in an investigation
● Students will be aware of the different kinds of compost systems
Objectives:
● Understanding energy transfer in a food web system
● Taking observed phenomenon and drawing conclusions
● Creating models of data to explore it further
● Exploring the process of decomposition of natural materials
Materials:
● Journals with data tables (one for each student)
● Pens/pencils
● Drawing utensils
● Direction sheets for each compost bin*
● Large sheet of paper (for whole group data table)
● Thermometers
● Microscopes/magnifying lenses (optional)
*note: the direction sheets can include instructions for collecting the type of data that feels most meaningful to your students. An example has been included at the end of this lesson plan.
Introduction:
1. Familiarize students with each of the three compost bins – their locations, how to access the compost, and what they immediately notice about the differences of each
2. Ask students to consider the question – why do we have three different compost bins?
3. Explain that the students will be scientists conducting an investigation on each of the compost systems to learn about decomposition
Activity:
1. Break students into three groups, one for each compost bin station
2. Send each group of students to a different station, with a direction sheet, thermometer, and magnifying tool (optional)
3. Students should record their data in their journal data table according to the direction sheet for their station
4. Signal to the groups to rotate to the next compost station, and collect data there
5. Once all groups have collected data at all stations, have the group come together as a whole and write in their data on the large sheet data table
Debrief (students sharing with someone from a different group):
1. Ask students what the differences and similarities between the three compost stations were
2. Ask students what evidence of decomposition they saw at each station
3. Have students come up with a representation — visual, physical, written, artistic — of what happens to natural waste (food scraps, dead plants, etc)
4. Revisit the initial question: Why do we have three compost bins?
5. Connect their answers to the larger food web of IslandWood
*Direction Sheet Example:
Earth Flow
1. Take a compost sample and rub it in the box labeled “earth flow” on page 11 of your journal
2. Stick the thermometer deep into the compost. Wait until the indicator stops moving, then record the temperature
3. Count the number of macroinvertebrates (bugs!) you see, and record
4. Draw the largest piece of material you see in the compost
5. Draw the different macroinvertebrates you see
6. Match the macros with those listed on page 18 of your journal
Allison Breeze is an elementary educator in the Puget Sound, currently working and learning as a graduate student at IslandWood.
Resources for further information:
Aydogmus, M., & Senturk, C. (2019). The effects of learning stations technique on academic achievement: A Meta-analytic study. Research in Pedagogy, 9(1), 1–15. https://doi.org/10.17810/2015.87
Chawla, L., & Cushing, D. F. (2007). Education for strategic environmental behavior. Environmental Education Research, 13 (4), 437-452. DOI: 10.1080/13504620701581539.
Gerçek, C., & Özcan, Ö. (2016). Determining the students’ views towards the learning stations developed for the environmental education. Problems of Education in the 21st Century, 69, 29. DOI: 10.33225/pec/16.69.29.
