by editor | May 27, 2012 | Marine/Aquatic Education
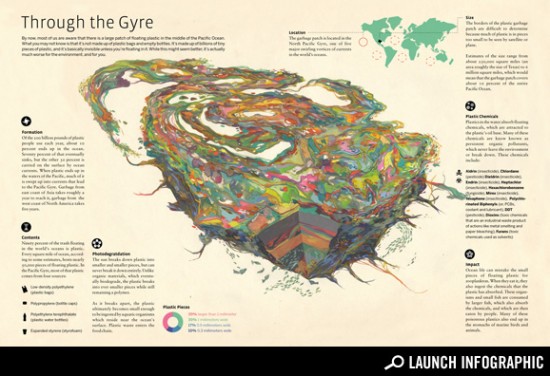
By now, most of us are aware that there is a large patch of floating plastic in the middle of the Pacific Ocean. What you may not know is that it’s not made up of plastic bags and empty bottles. It’s made up of billions of tiny pieces of plastic, and it’s basically invisible unless you’re floating in it. While this might seem better, it’s actually much worse for the environment—and for you. Take a look at the Pacific Gyre and the plastic floating in it.
.
Gyre illustration by Jacob Magraw-Mickelson
– from good.is
by editor | May 24, 2012 | K-12 Classroom Resources
1. Fukushima Daiichi Accident
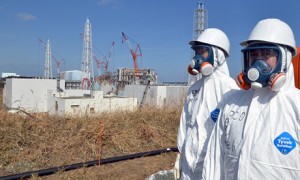
EarthEcho’s Water Planet Challenge provides information and materials to help middle and high school students take action to protect and restore our planet’s natural resources while teaching to key standards. The Hot Topics presents monthly interviews, information, and lesson plans covering critical news stories. The current topic is In the Wake of the Fukushima Daiichi Accident – One Year Later. Check out the educator resources, action guides, and more.
http://www.waterplanetchallenge.org/wpc/index.cfm/featured-resources/hot-topics/

2. Green Living Project Student Film Project
Green Living Project’s Student Film Project is a filmmaking competition that encourages students, from middle school through college, to produce a film, 5 minutes or less, telling a compelling story about a local or global sustainability-related project. The deadline for submission is May 25, 2012.
http://www.greenlivingproject.com/studentfilmproject/

3. Marine Science Camps for Youth and Families
Oregon Sea Grant is hosting summer day camps for different age groups (including families) in Newport, Oregon in July and August. Camps involve field trips, interaction with scientists, and various activities.
http://hmsc.oregonstate.edu/visitor/education-programs/day-camp
4. Ocean Science Summer Institute
Join the educators at Port Townsend Marine Science Center for this summer institute, June 25-28, 2012 from Port Townsend, Washington, and explore inquiry-based curriculum for grades 4-6.
http://www.ptmsc.org/teacher.html>

5. U.S. Forest Service Climate Change Resources
The U.S. Forest Service offers the Natural Inquirer for middle school and the Investigator for upper elementary school students. Recent issues deal with climate change and can be downloaded from the website. Classroom sets can also be ordered so that each student has their own copy.
http://www.scienceinvestigator.org/Pacific-Northwest-Research-Station-Climate-Change-Edition-i-3.html
http://www.naturalinquirer.org/
.
6. Global Schoolyard Bioblitz
Project Noah is teaming up with the National Environmental Education Foundation and National Geographic Education for the Global Schoolyard Bioblitz campaign. Teachers and students document the wildlife encountered in and around their school sites. The National Geographic website offers tools for any bioblitz, and students can upload their data to the Project Noah website.
http://education.nationalgeographic.com/education/program/bioblitz/?ar_a=1&force_AR=True

7. Deepwater Horizon Teaching Resources
The Online Clearinghouse for Education And Networking: Oil Interdisciplinary Learning (OCEAN-OIL) is a free, peer-reviewed electronic education resource about the Deepwater Horizon disaster. Resources include hyper-linked articles about the spill, teaching resources including games and teacher guides, links to additional sites, and much more.
http://www.eoearth.org/oceanoil
by editor | May 16, 2012 | K-12 Classroom Resources
Inquiry: Letting Kids Wonder
by Katie MacDiarmid
(reprinted from the SEECing Natural Discovery website of the Siskiyou Environmental Education Center)
 cientific inquiry” is one of those things I thought I knew how to do. I had taught middle school science and I’d worked several seasons of outdoor science school. I loved doing experiments with kids and I tried to incorporate them into my teaching as much as possible. I got into this field because of my love of doing science with kids. So I must have it down, right?
But as I researched ways to incorporate inquiry into environmental education for my “Trends in EE” class, I discovered that I still had a lot to learn. I slowly came to the realization that most of my attempts to “do science” with kids had actually been far too scripted to qualify as real science. I had followed the all-mighty “Scientific Method” because it was in all my textbooks. How could it be wrong? Besides, it was the only way I remembered learning science. As a teacher, I had tried to get kids to ask and then test their own questions (one of the key elements of “authentic” inquiry), but it had been extraordinarily difficult. The more I learned about authentic inquiry through my research, the more I realized that it didn’t have to be so hard.
Kids are naturally able to evaluate, critique, and defend their ideas based on validity and reasoning. They just need us to provide them with a meaningful context and some encouragement to begin “wondering.” When it comes to testing their own questions, the “tests” don’t always have to happen in the lab. One of the articles I read pointed out that, while “school science” nearly always includes testing one variable in the lab and controlling all others, many real scientists don’t work this way. Field biologists engage in descriptive and comparative studies. They build models and do surveys. The reason I had found it so hard for my students to investigate their own questions was that I was trying to squeeze all of their questions into a narrow mold. My research on scientific inquiry showed me a new way.
I’m not the only teacher who struggled to incorporate inquiry into the science classroom. Inquiry requires a subject interesting enough that students want to ask questions about it. It’s even more likely to be successful if students feel their investigation will make a difference in their world. Environmental education can provide both of these things, since nature provides an endless amount of complex subject matter and plenty of unsolved environmental issues. For this reason, I believe we can increase our students’ scientific literacy by incorporating environmental education into science classes at all levels. At the same time, inquiry is a sure way to develop traits essential to environmentally literate citizens. Inquiry can nurture an interest in natural systems as well as an understanding of their complexity. At the same time, inquiry develops the agency, critical thinking, and collaboration skills that are so desperately needed to move our students from knowledge to action. Authentic inquiry and environmental action are natural partners.
All this new knowledge makes me feel pretty guilty about my scientific method past. But I pledge, from here on out, to look beyond the textbooks to where the real learning happens. I am thrilled to be part of a team designing an inquiry framework for our Fall in the Field outdoor science program. And of course, I plan to incorporate inquiry into my student teaching lessons as well. I look forward to the next steps in my inquiry journey and I can’t wait for the discoveries to come.
Visit the SEECing Natural Discovery website at http://seecing.wordpress.com/

by editor | May 15, 2012 | Outdoor education and Outdoor School, Schoolyard Classroom
“Lessons for Teaching in the Environment and Community” is a regular series that explores how teachers can gain the confidence to go into the world outside of their classrooms for a substantial piece of their curricula.
Part 20: Beginning at the Beginning
.
 by Jim Martin, CLEARING guest writer
 n the last blog, we looked at planning an inquiry unit from the perspective of a student display, isolating the parts of the display and tracing them backwards. Now, let’s start at the beginning, and look at the inquiry unit as a scope and sequence. Until you’re comfortable taking your students out into the real world, it’s easy to forget some of the details in this kind of work until you’re on site, or waiting by the school for a bus you haven’t ordered. It happens!
It’s difficult, in the blog’s format, to construct a scope and sequence using a long timeline, so we’ll do it as a narrative. You might practice laying the parts out on a timeline, at least mentally, as the visual feedback often suggests things to do that you won’t notice as you read a narrative.
Our reed distribution inquiry began with the Casual Observation. At least, as written. However, just getting to the site means you’ve ordered a bus and substitute, have talked with your students about safety, given specific directions about clothing and lunches, sent permission slips home for parents to sign and return, looked for equipment students might need, prepared student logs so they can record their experiences, done a preliminary site visit yourself, and prepared the substitute’s lessons.
On a time line, these would line up on the left under a heading, “Casual Observation.” They would be on the left side of this column. On the right of that column, you would list the things students will do. For instance, they will need to know something about the site they will visit, and, in general, what they will be doing there. You’ll need to organize reference materials the class will need when they return, and decide which references you will carry to the site. All before you board the bus. So your timeline would begin at least a month before you’re on that bus, headed toward your site.
The actual observation won’t take up much space on the timeline. You ought to give your students a tour of the site. Then have them follow prompts you give them, or just follow their own noses. At first, this will depend on your comfort level. Eventually, it will depend on your recognition of the potential embedded in a student’s ownership of the work and learnings.
Where we go from here depends upon your schedule. If you’re here for the day, then your students can move through all the pieces of the unit. If you are planning for two briefer field trips, then the timeline will look different, but most of the components should be the same. Because this is a linear unit, with each piece completed before moving to the next, the parts of the scope and sequence will be similar, but the days won’t.
When students have completed their casual observation, you might have them share what they noticed. As students work, some may go to the references for information, others may not have thought of this, or are waiting. As you move around the site, some may ask for advice. Be careful not to tell them what they can find out themselves. A sentence that almost always works for me is, “Good question; how can you find out?” The number and kinds of questions students raise are mostly a function of their locus of control. Okay, let’s move to the Develop an Inquiry Question phase.
Before starting this phase, you should have samples of good and not so good inquiry questions for students to critique. Do you have them do this before, or after they have written two or three tentative questions? Again, this depends on your comfort level and teaching style. Because Assimilation is one of the main conceptual structures that underlie the organization and delivery of my curriculum, I like to have students write first, so they have concrete referents to use when we discuss the characteristics of good inquiry questions.
The process is simple, but takes time. Basically, students write and critique inquiry questions using the examples you provide until they have one or two they are comfortable with. Then, they assess these questions and develop a final inquiry question. You might introduce the concept of operational definitions if appropriate, and naming protocols, which are sort of operational definitions. (Use naming protocols for plants or animals whose names they are unsure of. Mine was, “Give it a name and use it until you have good reason to change it.” This seemed to work; relieves anxiety and reduces confusion.)
If you’re doing two field trips, you’ll want to check permission slips, equipment, bus, and sub. So, under Develop an Inquiry Question, you would just have something like Develop an Inquiry Question on the right, and Prepare Sample Questions and Assessment Criteria on the left, and if you’re doing two trips, check permission slips, etc., on the left. (You might have noticed that all of the items we’ve been adding fall into two groups, logistics and pedagogy. This could be a way to further clarify your scope and sequence.)
After students have developed their inquiry question, they need to Design an Investigation. This is always pretty straightforward; their question tells them what to do to answer it. The other items in this column might be safety reminders, prep the analytical math they’ll need to process their collected data, practice using tables to organize observations, and practice on any equipment they plan to take into the field. They are important, not so much to the design of their investigation as to the next item, Collect Data. However, this is the time, before they leave the school, to do this. Of course, you can move it to Collect Data. I like the idea of prepping these things as students are designing their investigations because they have an opportunity to integrate these concepts into their planning at a time when it makes sense to them.
The Collect Data column is short, unless you include the logistical pieces in it, like take the bus, arrive at site, go to stations, collect data, pull the work together, return to bus. Students ought to iterate safety rules before you release them into the site. After that, students do the work and return to school. By this time, they ought to be the well-oiled machine.
Back at school, they Analyze and Interpret their data. Now that they have concrete referents about data, this is a good time to review what they learned about tables and analytical math. Since student groups will move through this phase at different paces, show them what you want to include (but not be limited to) in their reports and displays, if they are making them. As questions arise, this is where you do targeted mini-lectures. Most classes will welcome a demonstration of the analysis of a hypothetical set of data, both the mathematical and graphical analyses and interpretations. If you’re weak in this area, and lots of us are, this can be a good learning experience for you.
After students have analyzed and interpreted their data, they prepare to Communicate it, the last heading in the scope and sequence. They should at least make a presentation to the class, complete with a poster. You’ve already briefed them on what to include in their display, and this is a good time to reiterate it. After all reporting is done, you ought to consider having the class summarize the meaning of all of the findings. You’ll find, over the years, that you’ll learn as much about teaching as they learn about environments.
This description of attempting to use a scope and sequence has generated a great deal of detail. More detail than you’d want on a simple timeline. You can take lumps of these details, give each lump a name that makes sense to you, and just name the lump. It will help build a better scope and sequence. Somewhere below these briefer descriptors you can jot down the details. (I’ve used spreadsheets to do this, since you can go as far to the right, and down, as you want.)
It may be time, while we’re engaging underlying structures, to examine their significance. Next time, we’ll do this, and discuss some of the reasons structure is significant.
 This is the twentieth installment of “Teaching in the Environment,” a new, regular feature by CLEARING “master teacher” Jim Martin that explores how environmental educators can help classroom teachers get away from the pressure to teach to the standardized tests, and how teachers can gain the confidence to go into the world outside of their classrooms for a substantial piece of their curricula. See the other installments here, or search Categories for “Jim Martin.”

by editor | May 5, 2012 | Questioning strategies

“Lessons for Teaching in the Environment and Community” is a regular series that explores how teachers can gain the confidence to go into the world outside of their classrooms for a substantial piece of their curricula.
Part 19: Walking Backwards May Get You There
Working backwards is a good way to nail down understandings. It’s also a good way to test your students’ understanding of science inquiry.
by Jim Martin, CLEARING guest writer
We’ve been looking at inquiries as they go from beginning to middle to end. What might they look like if we start our inspection at the end of an inquiry, and trace it to its inception? Will it sound the same? Are there some insights lurking along the backward path? Retracing a path you’ve walked or driven often contains some surprises.
Let’s start with an end product, a two-panel cardboard display board sitting on a counter in the classroom. On its surfaces, students have written and illustrated their question and how they arrived at it, the design they built to answer the question, the data they collected, their analysis and interpretation of the data, and their conclusion about whether the interpretation answers the question. (That last piece is an easy one to overlook. Studies can take on a life of their own, and students sometimes forget why they started on their journey!)
Think of that display as a benchmark; the evidence that a student has mastered the learning it, the benchmark, encompasses. If you’ve ever used benchmarks to design the scope and sequence of a unit, you’ll know they do have good, practical, pragmatic uses. They tell you what you want to accomplish, and your scope and sequence tells you how they will get there. If you keep the benchmark in mind, you’ll find it easier to keep your scope and sequence focused, targeted on the benchmark. This is different from looking up a required benchmark and seeing if your lessons have addressed it, a common, ineffective, current pedagogical practice.
So, let’s take the last activity we described, a study of temperature and dissolved oxygen in the main and lateral channels of a stream. What do the writing and illustrations on the panels of the display tell you that students have to learn? Well, an obvious one is that they have to know how to organize a complex report. So you make Report Writing one of the topics to cover. To get to the final product, they have to be able to work in Effective Work Groups. This means you need to be working on building these well-oiled machines early on.
Moving back, they have to know how to Construct and Read a Graph for the information it contains, and Explain this Clearly in Writing. They have to know how to Refer their Interpretations back to their Question. And they have to have the capacity to engage in Critical Thinking in order to do this. This is one of the weak spots in education in the US. Getting the right answer on a multiple choice question isn’t critical thinking. My own questions of students and a number of studies show quite clearly that, no matter how well critical thinking would help make the right choice, students just look for the best answer, or choose between two likely answers. They don’t think unless you ask them to write their thinking on the test itself.
During their work, they will have to know how to Analyze Data. This means you’ll have to assess their competence in the math they’ll use for the analysis, and they’ll have to practice figuring out what the results of the math mean. Often, this means that we, the teachers, need to brush up on this. Not to mention the Outliers in the Data that they’ll have to make decisions about. Students are working with two measurements, temperature and dissolved oxygen. How do they analyze them? Deal with outliers?
Collecting Data is just a term, but it’s a big part of the work. Students will have to know how to Measure Temperature and Dissolved Oxygen. This means time in the lab, and the conceptual background to Understand the Relationship of one to the other, and to the lives of juvenile salmon. (Analogy to doing my budgets to find out what I’m really doing.) As they encounter problems, they’ll need to know how to Negotiate Meaning in a group. They’ll need to know how to Organize their Sampling; do they sample at the edge of each channel? Within the channel? How many measurements at each place they sample? Actual sites are very different from the lab. In the lab, everything is organized, and sitting just where it is needed, in its proper order. The real world is messy; until you’ve sampled in it a while, it can be a very confusing, disorderly place. Safety on the site: What Safety Rules do you have to discuss with the class and write down? The work: How do they divide the jobs?
Designing the Investigation; how do students go about this? If they’ve asked a succinct inquiry question, it will tell them what to do. They just list the steps the question calls for. This is usually the easiest part of the work to do. You simply need to get them started, then walk around and review what they’re talking about and writing down. You’ll find that their locus of control has moved within them, they exhibit all the characteristics of ownership of the learning. Plan for enabling your students’ locus of control and ownership of the learning, or it won’t happen in the clutch.
Asking a good Inquiry Question is probably the most difficult part of the work. After developing a question, students assess it. There are lots of assessment rubrics around. Here’s one I use, thanks to Norie Dimeo-Ediger and Berk Moss, who passed them on to me while we were doing institutes at the Oregon Zoo. A good inquiry question is: interesting to you, simply stated, observable, and doable. And one other, thanks to Mike Weddell – Ethical. (That last may not seem applicable to you until your students are disturbing plants, animals, and soils in ecosystems.)
The questions themselves are very difficult to arrive at until we’ve asked a relatively large number of them. This is partly because we haven’t lived our learning lives out in the world we evolved in. So we are a bit overwhelmed by the complexity we observe there, and subsequently ask very large questions. These large questions often begin with “Why.” Why do birds fly south in winter; how do aquatic organisms reduce pollution; why do leaves break up and decompose on the bottom of a pond; why did these trees grow the way they did here? These are what I call ‘umbrella’ questions. They don’t lead to one succinct inquiry which will answer them. Rather, they beg several to many smaller inquiry questions.
For instance, I might ask an umbrella question like, “Why do reeds grow in narrow bands along this river’s edge?” Think of answering ‘Why’ questions in this facetious way: Do I design a questionnaire, then go out and ask the reeds its questions? That’s a very common way to get an answer to a Why question. Or, I might take a different tack and ask the Why question what smaller questions might provide an answer to it.
Why questions and How questions are almost always umbrella questions, which can only be answered by sets of succinct inquiry questions. One inquiry question that might begin to answer my Why question about reeds might be, “Where, on a line from the water’s edge to a spot 100 meters up the streambank, do reeds live?” An answer to that should tell me what particular part of the reeds’ environment to question for an answer to my umbrella question.
A follow-up question might be, “What are the properties of the soil at the streambank’s waterline, the streamside edge of the reeds’ distribution, the streambank side of the reeds’ distribution, and soils at 10-meter intervals thereafter?” Not a succinct question, though. Not simply stated. That’s my cue to think about what I’ve just said. Thinking about it, I suddenly see that it’s more like a piece of a design to answer my inquiry investigation. I could make my inquiry question more succinct by simply asking about soil properties at 10-meter intervals from the waterline, or soil properties in the band of reeds, and on either side of the band. If I suspected soil moisture might contribute to the reeds’ distribution, I might ask, “What are soil moisture properties between the band of reeds and the stream, in the band of reeds, and 10 meters up the stream bank from the reeds?” I’ll continue with this one, but am still uneasy about the long predicate.
The time it takes to do this well is worth the expense. It’s key to doing inquiry. Work out your own way to do it; just be sure to do a quality job. And don’t forget, it takes lots of practice to get to the place where you routinely see something and ask a simple inquiry question about it.
Let’s assess this last question. First, is the question interesting to me? If I’d never seen reeds, the answer might be, ‘No.’ However, I have done a casual observation, and their tight distribution along the streambank came to my immediate attention. So, I’d say the question is interesting to me. Too often, students are given their question. Not a good way to make a question interesting.
Second, is the question simply stated? I say yes and no. It’s a long sentence, and I might spend some time thinking about how to shorten the description of where the soils are that I’m interested in. Perhaps I could change my question to, “How does soil moisture compare between the band of reeds and the rest of the streambank?” That way, my investigative design can do the work of describing just which soils I’m interested in. I like that; it is what I will do.
Third, is the question’s subject observable? Oh, yes. I find the soil, I dig, I test for moisture, I write down a number. Easy. Fourth, is answering the question doable? Well, that depends on how much time I have to do the sampling and testing, if I have the equipment, and if I can get transportation to the site. If those needs are met, then it’s doable, and I can get to work. If not, I’ll have to rethink my ideas.
It looks like my question has survived, and I can get to work. Earlier, I mentioned a casual observation. Let’s look at that now. You can’t ask an inquiry question without knowing something about the subject of your inquiry. It’s the weakest part of most publishers’ lab and field exercises. Many have the student write an hypothesis in the absence of experience, something scientists don’t do until they’ve thoroughly studied a phenomenon with many individual inquiries. The casual observation gives students an opportunity to get to know the subject well enough to ask an informed question of it. We owe them that much
When you send students out for their casual observation, and it’s their first such experience, you might think of giving them brief prompts like, Look for plants, Look where the water meets the land, or Look where plants live. Another thing to consider – students will be negotiating meaning while they’re doing their casual observation, and that tends to be best when they work in dyads, pairs. A third student will probably let the others do the work. At this point, it’s very important for each student to be closely involved in the work, and to be sharing thoughts with a partner. This is where the process of assimilation for understanding begins. If you can’t arrange the casual observation without one triad, then make sure each member is a good communicator.
Don’t tell your students specifics about what they are about to do, just what the next step is. Their brain has to do the learning. This is a toughie. We always want to help them, but this is learning they have to do themselves. And can.
We’ve walked through an inquiry from very end to beginning. Next time, we’ll bring this together to scope and sequence how the unit would work. See how it looks from beginning to end. This is a skill we all need to develop and use.
 This is the nineteenth installment of “Teaching in the Environment,” a new, regular feature by CLEARING “master teacher” Jim Martin that explores how environmental educators can help classroom teachers get away from the pressure to teach to the standardized tests, and how teachers can gain the confidence to go into the world outside of their classrooms for a substantial piece of their curricula. See the other installments here, or search Categories for “Jim Martin.”
