
by editor | Jun 7, 2013 | Place-based Education, Schoolyard Classroom
Stepping into the Real World – What happens when you open the door
by Jim Martin,
CLEARING Associate Editor
Let’s explore what science and environmental education could look like if we were to use the real world as if it were an authentic source of curriculum, and a place to start our work. The place we’ll explore is a suburban school yard. There is a small creek at the edge of the school property. Its west side has a tall fence at its edge; beyond is an apartment complex. On the school side, the bank faces a playing field. There are trees and shrubs along both sides of the bank. Closer inspection reveals that the stream has two riffles along its length, a glide or run above the first riffle, between the two riffles, and beyond a pool at the end of the second riffle. Riffles are places in a stream where the water splashes and turns white. Glides or runs are places where the water moves quickly, but doesn’t splash. Pools are places where the water moves slowly, and has a relatively smooth surface. (more…)

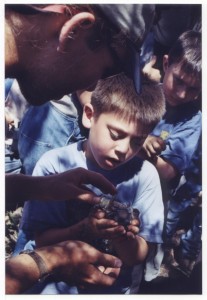
by editor | Jan 4, 2013 | Environmental Literacy, Questioning strategies, Schoolyard Classroom
Do It Yourself First: Leading Student-Directed Inquiry

by Jim Martin
CLEARING guest writer
 f you’ve never taken your elementary, middle, or secondary students out of the classroom to learn, and can’t find a helpful mentor or workshop, it’s okay to learn to use the real world to generate curricula and teach for understanding rather than to pass tests just by doing it. Just make a plan and stick to it, and you’ll be okay. Try a place on your school grounds first, then move to a place in the community when you’re comfy.
There is a simple way to do a student-directed inquiry outside your classroom, involving observations on invertebrates. You can use it to discover whether this kind of work is comfortable for you to do, and if it generates curricular content that satisfies your anxieties about meeting mandated standards and benchmarks. You can start it on your school grounds, or if you’re not comfortable with that, right in your classroom. The only caveat is that you have to let your students think and ask questions, and follow the parts of the project that capture their interest. That is, after you’ve first guided them (and yourself) through the process.
ALERT: You need to be a CLEARING subscriber to read the rest of this article.
(enter password then hit return button on your keyboard for best results)
[password]
The nice thing about the project we’ll be describing is that it begins with you facilitating a guided inquiry. It doesn’t matter what grade level you teach, the basic work applies to all of them. The vocabulary and complexity of conceptual content will vary with grade level and student experience, but the basics apply to all levels. The plan is this: We’ll make a small compost heap, then see what comes to live in it. Then we’ll have our students do the same. Simple, but loaded with potential.
First, do your own inservice, perhaps this summer. Start the compost in your own yard or somewhere on the school grounds as your source. Don’t place it where it will always be in direct sunlight, since it needs to stay moist. Put about 5-10 gallons worth of different kinds of plant material in it and turn it once a week with gloved (or ungloved) hands. Keep it moist, but not wet. It’s necessary to start outdoors to attract the invertebrates and microbes which will populate your students’ compost ‘piles.’ As you tend your compost heap, notice what is living there. (If you’ve already done this, I’ll bet you’ve gone to a book or the web about what you’ve found. That’s your brain doing what it’s designed to do.)
As you do your work, try out some learning activities. What is the temperature at the surface of the heap, and in its depths? How do you go about measuring the temperatures? Any glitches? Ask yourself how any temperature differences might have come to be. If it’s not directly explainable to you, who might you ask to find out? (This is a skill we all have to develop when we move out into the real world.) What mathematics activities can you use to make sense of the temperature data? What tells you more, the numbers themselves, or their graph, average, median, range? Would the data be different if the compost heap was larger or smaller? Let’s look at more of the things we can learn.
After your compost heap has been working awhile, you should be finding an increase in the numbers of invertebrates living there. If this isn’t the case, go to places where plant material is obviously decaying and bring samples back to your heap. Keep a record of how many species you find in your heap as you turn it, and how many of each you observe. This means you’ll have to be systematic about how you turn the heap. And about how you record the information you measure, count, and observe. You can pass these skills and understandings on to your students.
As you count species and their numbers, use that data to track species diversity in your compost heap. As a rule of thumb, the greater the species diversity, the healthier the system. Whether you work with kindergartners or high school seniors, you’ll need to know something about species diversity. You can google the term, find some sites which explain it in a way you can understand, and which detail some of the math used to make sense of the numbers. Here’s one you can use; a little esoteric at first glance, but ultimately doable; Simpson’s Index, D = Σ ni(ni-1)/ N(N-1), where D is Simpson’s Diversity Index, Σ stands for ‘the Sum of,’ ni is the number of organisms you counted in the ith species (so the number of organisms in the 3rd species you counted would be n3, and i goes from 1 to the total number of species you counted), and N is the total number of individuals counted among all species. This means that you take the sum of the numbers you get from multiplying the number you counted in each species times that number minus 1, then divide that sum by the total number of individuals you counted times that number minus 1.
Try it for 3 species: Species A, with 10 individuals; Species B, with 5 individuals; and Species C, with 20 individuals. The first ni set is 10(9), the second is 5(4), and the third 20(19), which totals to 490. There are 35 individuals all together, so the denominator is 35(34) = 890. Dividing 490 by 890 gives you about 0.56. What if the counts were 23, 51, and 36? Your numerator and denominator should be 4,316/11,990. If this is confusing, say so in a comment below, and I’ll get back to you with more details.
Sounds complicated, but by the time you’ve done three or four sets of species, you’ll get it down. Just be sure that you sum all the individual counts times themselves minus 1 before you divide by the total counted times the total counted minus 1. The answer to all this, D, gives you a number you can compare with other counts you or your students make. Remember, the reason you need to try this diversity calculation is to get an idea of one way that diversity is described. With your students, you can just use the total number of species present to stand for the same thing. This is the simplest math which can be used to estimate species diversity, the total number of species, a number students can use to compare the number of species in different compost heaps, and which may correlate with other measures of diversity.
There is a spectrum of ways to name diversity: number of species, species richness, species evenness, or a calculation like Simpson’s Index. None do a perfect job, since diversity is a dynamic with many aspects. For now, you can only choose one and use it consistently until you have good reason to use another statistic. We’ll take another look at this in the next blog.
Use your counts of living things to graph a population curve. Choose one species and plot it with time on the x-axis, and number of individuals on the y-axis. This is a population growth curve, and they are an indirect way of determining how an environment treats a particular species residing within it. In setting up your compost heap, you’ve created a new environment, and populations living within it should increase during the initial exploitation phase. Soon enough, those curves will change, raising nice inquiry questions.
Use the heap itself for learning. How big is it? Is it always that big? Bigness can be derived from measurements that students make. How tall is it? How wide? How long? How can you determine its volume? Do any of those numbers correlate with the range of temperatures in the different compost heaps? Species diversity? Population curves? Temperature range and diversity?
What about the biology of the organisms living in the heaps? If you’re up to it, you can take a piece of liver, blend it with a little water or electrolyte like pedialyte, then introduce a drop of this to a container with 250 ml or more of hydrogen peroxide (H2O2 ). Take the temperature of the hydrogen peroxide before adding the liver extract, then periodically during the next 20 minutes. As simple carbohydrates are metabolized to produce useable energy in the form of ATP in nearly all organisms from microbes to Homo sapiens, the extra oxygen atom in one of the intermediary products, hydrogen peroxide, is released leaving water (H2O), an oxygen atom (O), and the energy which held the oxygen atom in place. That energy isn’t re-used, and goes off as heat. Compare the results of this experiment with your data on population and temperature. Is there something to be learned? Might your students understand the basics of what they observed?
What can you find out about four of the species in your compost that explains how they are able to live there? The organisms you find are living in a dynamic relationship which keeps the entire community alive, an economy which cycles materials and moves energy in a productive way. Can you build some elements of a food web from the information you have? What else can you find out about the biology and ecology of compost heaps?
If you teach or use language arts, how can you use the compost heap and its components as metaphors to drive a piece of writing? A piece of art? Music? If you teach science, and have never used these arts and humanities deliveries, try one. You might be surprised at what you’ll learn. I certainly have been.
When you’ve studied your compost heap long enough to feel comfortable with it, have your students learn some thing about them. Use the piece you have the best handle on. The first time through the process with your students, you demonstrate each step. Let students ask questions or make observations as you feel comfortable. You can use your own compost, and demonstrate how to turn it to expose the invertebrates living there. (If you’re up to it, you can find out how to plate out microbes that will be living there, and find out what they do and who eats them.)
When you’re ready for your students to do theirs, have each group start compost heaps somewhere in the schoolgrounds, one 5 gallons in size for each group of four or five students. You can also have students bring in their own mulch, etc., or place boards on the ground at home then collect what’s living on and under them including any molds they find. You might suggest they place the animals in a jar of moist compost, keeping the lid slightly ajar for air, and simply bring the board in and set in in their compost heap. Once compost heaps are doing well (outside the building), you can make ‘sand traps’ by filling plastic bucket lids with a layer of sand and placing them next to a compost heap. Any small mammals or birds who are attracted to the compost will leave footprints in the sand. These don’t always work, but are pretty neat when they do. This will raise questions they can begin to answer.
[/password]
 This is the twenty third installment of “Teaching in the Environment,” a regular feature by CLEARING “master teacher” Jim Martin that explores how environmental educators can help classroom teachers get away from the pressure to teach to the standardized tests, and how teachers can gain the confidence to go into the world outside of their classrooms for a substantial piece of their curricula. See the other installments here, or search Categories for “Jim Martin.”

by editor | Oct 5, 2012 | Schoolyard Classroom
 by Bobbie Snead
Straub Environmental Learning Center
 he male osprey swoops down to join his mate on the enormous stick nest in Minto Brown Park. Sixty yards away, the third graders from a local elementary school gasp and clap in delight. I’ve taught them about ospreys in their classroom and now they’re getting to see the real thing. They are more excited than if they’d been on an African safari. This moment is my passion. (more…)

by editor | May 29, 2012 | Learning Theory, Questioning strategies, Schoolyard Classroom
“Lessons for Teaching in the Environment and Community” is a regular series that explores how teachers can gain the confidence to go into the world outside of their classrooms for a substantial piece of their curricula.
Part 21: Where Brains Learn
Some cognitive particulars about learning in the real world
 by Jim Martin, CLEARING guest writer
 he crack, a river, flows from the upper left corner of the wall, spreads into branching riverlets as it nears the window. That sentence was written in metaphor. The next sentence has no metaphor, but carries the same information: There was a crack in the wall which branched as it neared the window. Which will you remember? Which brings recallable pictures to your mind? This is like engaging in science inquiry in the real world. Compared to reading about the results of science inquiry in the real world. Each gives a visual clue, but which will come most easily to mind?
This is like science made vs. science in the making. The place of Assimilation is learning for understanding. When you engage your students in the real world, it acts like a metaphor, clarifies concepts and rectifies them with experience.
When you use the conceptual structures which underlie learning, they act as metaphors to clarify what you and your students are doing and learning. These structures are like the mirrors in a kaleidoscope which always generate the underlying structure of the image you see, and the pieces, ordered by that structure, are what you respond to. Can I add a little more to this?
We’ve been examining the conceptual structures that underlie learning, and how concrete experience in the real world encourages our brains to engage those structures. They reside in the architecture and processes of the brain. A picture of how they work to build understanding began to clarify itself to me during my teaching years. The brain is the organ of learning, and its structure and function does facilitate learning, especially when the delivery of the learnings recognizes how the brain works. Just as knowing the structure of color facilitates painting with water colors. When you dip the brush and apply it to paper, you know and anticipate what will happen. The underlying structure determines, to a large extent, what emerges.
Many of us carry an image of the human mind as an entity disembodied from our brain, an ethereal thing that goes where we go, and does our thinking for us. And no wonder. We can’t see the brain work, even in our classrooms. It doesn’t move the way muscles do, and it makes no sound. The best we can do is to know what the work of the parts of the brain are, and look for evidence of what they do in the things our students do and think.
Take Assimilation. The concept of Assimilation has varied descriptions, depending on who’s doing the describing. They generally carry this piece: What the learner personally experiences in the world about is incorporated into the world within our mind or brain. Its strength lies in the interaction between our brain and objects in the world outside ourselves. These are concrete interactions, and they work perfectly with the way our brain is organized to learn. Our brain learned to learn in the real world, where engaging concrete objects led to the kinds of abstractions that emerged as spear throwers and paintings on rocks, sticks, and cave walls. That is what makes metaphor such a powerful writing and rhetorical vehicle. It clarifies a subject with visual, tactile, olfactory, aural, and taste details that engage our senses, and make complexities open to understanding. A brain which developed in a concrete world is able to soar. Marvelous!
I often mention concrete vs. abstract referents. You can do the following as an experiment if you teach the same thing to two classes. When we are presented with new material in an abstract form, like a paragraph of information, we can put it into long term memory by using the information several times. Think of the end-of-section questions, where students answer questions by reviewing what they have read about particulars. Like Procedural Memory, which helps us carry out actions, it may stay with us, but different but related pieces won’t be stored as one concept. When we actually engage concrete referents, a thermometer in a stream, we engage Declarative or Distributed Memory, episodes and facts that can be brought to mind consciously, where new learnings are incorporated into concepts already residing in the brain. Let’s look at some of the parts of the brain involved in these processes.
When a student holds a thermometer in her hand and immerses it into the cold waters of a glacier-fed stream, her eyes send visual information about this to the visual processing areas in the Occipital Lobe of her brain, at the very back of her head. The Parietal Lobe, between the Occipital Lobe and the middle of her head, processes the feeling and temperature of the water on her hand. It also keeps track of where her person ends and the rest of the world begins, then gathers the visual, tactile, and coolness information, and passes it to other parts of the brain which carry memories of all these things.
You can get a sense for how this functions when you sit down to enjoy your favorite beverage, say a latte. (Now, you have to tell yourself that you’re here to learn. That sets things up in your brain.) As your fingers move toward the cup’s handle, you become very aware of the shape of the handle just outside your skin, and the round shape of the cup. You may have brief perceptions of other cups, perhaps a favorite that is still in the dishwasher. You can see the foamy latte part of the beverage near the top of the cup, and anticipate its flavor. Certainly you’ll be aware of its texture, fine bubbles, color, pieces that your tongue loves to discover. And the coffee itself. You’ll know what kind it is, where it was grown, color, anticipated taste, texture, and the bouquet it always leaves in your mouth after you’ve sipped it. You may even be aware of the brands of the latte and coffee, and other facts of these ingredients of the beverage. You may have brief recollections of other places you’ve had this particular blend, who was there, and what you were doing.
These things happen very quickly, but they are perceptions perceived. Each piece of information came from specific parts of your brain, and these were processed together in your prefrontal cortex, at the front of you head, as what is currently called Working Memory. The prefrontal cortex is also the place where you engage critical thinking. Nice.
So, by doing something when you’ve told yourself that you’re doing it to learn, you suddenly have all of the things you’ll need to help you learn brought together in the part of the brain that can do the learning. Why shouldn’t we use the structure and function of the brain to enhance the delivery of our curricula? Let’s take this idea back to the young woman immersing her thermometer into the waters of a stream.
As she picks up the thermometer, positions it in her hand so she can see its graduations, she becomes very aware of its shape, its use, her expectations for what it will tell her, the particular reason she is picking it up, the memories she already has about streams, and thermometers, and, because she’s here to learn about salmon, some thoughts about how salmon like the temperature of their water.
She is on the first hour of a one week unit on watersheds, so doesn’t know a great deal about water temperature, salmon, and watersheds. None the less, what memories she does have of these things come together with all the rest in working memory, ready to learn.
So, she measures the temperature of the water, and it’s twelve degrees celcius. Her working memory doesn’t know where to fit this in, what I call a Need to Know. So she looks for the reference book that is part of the contents of the box she helped carry down to the streambank. Finding it, she looks for information about salmon and temperature, and finds they prefer waters with a range of temperatures between 4.4 and 14.0C. Then her prefrontal cortex, the site of critical thinking, begins to use the information she has gleaned and memories stored, to engage the prefrontal cortex’s functions of perseverance, self-monitoring and supervision, problem solving, orchestration of thoughts and actions in accordance with internal goals, compare and contrast, working toward a defined goal, expectation based on actions, extract and reconstruct sequences of meaning from ongoing experience.
That’s a long list, a partial one, of the functions of this site of human learning that current US curricula generally overlooks. Contrast this with the teacher telling students about salmon and water temperature, the student reading in the text about it then answering questions in the back of the chapter about these things. Compare and contrast (using your prefrontal cortex!) this with the rich texture of meaning in the young woman with the thermometer.
Next time we’ll look some more at this underlying structure of learning.
 This is the twentyfirst installment of “Teaching in the Environment,” a regular feature by CLEARING “master teacher” Jim Martin that explores how environmental educators can help classroom teachers get away from the pressure to teach to the standardized tests, and how teachers can gain the confidence to go into the world outside of their classrooms for a substantial piece of their curricula. See the other installments here, or search Categories for “Jim Martin.”

by editor | May 15, 2012 | Outdoor education and Outdoor School, Schoolyard Classroom
“Lessons for Teaching in the Environment and Community” is a regular series that explores how teachers can gain the confidence to go into the world outside of their classrooms for a substantial piece of their curricula.
Part 20: Beginning at the Beginning
.
 by Jim Martin, CLEARING guest writer
 n the last blog, we looked at planning an inquiry unit from the perspective of a student display, isolating the parts of the display and tracing them backwards. Now, let’s start at the beginning, and look at the inquiry unit as a scope and sequence. Until you’re comfortable taking your students out into the real world, it’s easy to forget some of the details in this kind of work until you’re on site, or waiting by the school for a bus you haven’t ordered. It happens!
It’s difficult, in the blog’s format, to construct a scope and sequence using a long timeline, so we’ll do it as a narrative. You might practice laying the parts out on a timeline, at least mentally, as the visual feedback often suggests things to do that you won’t notice as you read a narrative.
Our reed distribution inquiry began with the Casual Observation. At least, as written. However, just getting to the site means you’ve ordered a bus and substitute, have talked with your students about safety, given specific directions about clothing and lunches, sent permission slips home for parents to sign and return, looked for equipment students might need, prepared student logs so they can record their experiences, done a preliminary site visit yourself, and prepared the substitute’s lessons.
On a time line, these would line up on the left under a heading, “Casual Observation.” They would be on the left side of this column. On the right of that column, you would list the things students will do. For instance, they will need to know something about the site they will visit, and, in general, what they will be doing there. You’ll need to organize reference materials the class will need when they return, and decide which references you will carry to the site. All before you board the bus. So your timeline would begin at least a month before you’re on that bus, headed toward your site.
The actual observation won’t take up much space on the timeline. You ought to give your students a tour of the site. Then have them follow prompts you give them, or just follow their own noses. At first, this will depend on your comfort level. Eventually, it will depend on your recognition of the potential embedded in a student’s ownership of the work and learnings.
Where we go from here depends upon your schedule. If you’re here for the day, then your students can move through all the pieces of the unit. If you are planning for two briefer field trips, then the timeline will look different, but most of the components should be the same. Because this is a linear unit, with each piece completed before moving to the next, the parts of the scope and sequence will be similar, but the days won’t.
When students have completed their casual observation, you might have them share what they noticed. As students work, some may go to the references for information, others may not have thought of this, or are waiting. As you move around the site, some may ask for advice. Be careful not to tell them what they can find out themselves. A sentence that almost always works for me is, “Good question; how can you find out?” The number and kinds of questions students raise are mostly a function of their locus of control. Okay, let’s move to the Develop an Inquiry Question phase.
Before starting this phase, you should have samples of good and not so good inquiry questions for students to critique. Do you have them do this before, or after they have written two or three tentative questions? Again, this depends on your comfort level and teaching style. Because Assimilation is one of the main conceptual structures that underlie the organization and delivery of my curriculum, I like to have students write first, so they have concrete referents to use when we discuss the characteristics of good inquiry questions.
The process is simple, but takes time. Basically, students write and critique inquiry questions using the examples you provide until they have one or two they are comfortable with. Then, they assess these questions and develop a final inquiry question. You might introduce the concept of operational definitions if appropriate, and naming protocols, which are sort of operational definitions. (Use naming protocols for plants or animals whose names they are unsure of. Mine was, “Give it a name and use it until you have good reason to change it.” This seemed to work; relieves anxiety and reduces confusion.)
If you’re doing two field trips, you’ll want to check permission slips, equipment, bus, and sub. So, under Develop an Inquiry Question, you would just have something like Develop an Inquiry Question on the right, and Prepare Sample Questions and Assessment Criteria on the left, and if you’re doing two trips, check permission slips, etc., on the left. (You might have noticed that all of the items we’ve been adding fall into two groups, logistics and pedagogy. This could be a way to further clarify your scope and sequence.)
After students have developed their inquiry question, they need to Design an Investigation. This is always pretty straightforward; their question tells them what to do to answer it. The other items in this column might be safety reminders, prep the analytical math they’ll need to process their collected data, practice using tables to organize observations, and practice on any equipment they plan to take into the field. They are important, not so much to the design of their investigation as to the next item, Collect Data. However, this is the time, before they leave the school, to do this. Of course, you can move it to Collect Data. I like the idea of prepping these things as students are designing their investigations because they have an opportunity to integrate these concepts into their planning at a time when it makes sense to them.
The Collect Data column is short, unless you include the logistical pieces in it, like take the bus, arrive at site, go to stations, collect data, pull the work together, return to bus. Students ought to iterate safety rules before you release them into the site. After that, students do the work and return to school. By this time, they ought to be the well-oiled machine.
Back at school, they Analyze and Interpret their data. Now that they have concrete referents about data, this is a good time to review what they learned about tables and analytical math. Since student groups will move through this phase at different paces, show them what you want to include (but not be limited to) in their reports and displays, if they are making them. As questions arise, this is where you do targeted mini-lectures. Most classes will welcome a demonstration of the analysis of a hypothetical set of data, both the mathematical and graphical analyses and interpretations. If you’re weak in this area, and lots of us are, this can be a good learning experience for you.
After students have analyzed and interpreted their data, they prepare to Communicate it, the last heading in the scope and sequence. They should at least make a presentation to the class, complete with a poster. You’ve already briefed them on what to include in their display, and this is a good time to reiterate it. After all reporting is done, you ought to consider having the class summarize the meaning of all of the findings. You’ll find, over the years, that you’ll learn as much about teaching as they learn about environments.
This description of attempting to use a scope and sequence has generated a great deal of detail. More detail than you’d want on a simple timeline. You can take lumps of these details, give each lump a name that makes sense to you, and just name the lump. It will help build a better scope and sequence. Somewhere below these briefer descriptors you can jot down the details. (I’ve used spreadsheets to do this, since you can go as far to the right, and down, as you want.)
It may be time, while we’re engaging underlying structures, to examine their significance. Next time, we’ll do this, and discuss some of the reasons structure is significant.
 This is the twentieth installment of “Teaching in the Environment,” a new, regular feature by CLEARING “master teacher” Jim Martin that explores how environmental educators can help classroom teachers get away from the pressure to teach to the standardized tests, and how teachers can gain the confidence to go into the world outside of their classrooms for a substantial piece of their curricula. See the other installments here, or search Categories for “Jim Martin.”
by editor | Apr 10, 2012 | Questioning strategies, Schoolyard Classroom
“Lessons for Teaching in the Environment and Community” is a regular series that explores how teachers can gain the confidence to go into the world outside of their classrooms for a substantial piece of their curricula.
Part 17: Discovery of Students as Persons
Students, engaged, empower teachers; a first step toward Community and Environment Based Learning
by Jim Martin, CLEARING guest writer
 The discovery and appreciation of effective student work groups often emerges from involving students in community-based learning. Probably because the work, based in and on the real world, is authentic, and entrains central nervous system processes which are already in place. This is an important developmental learning milestone, and can be exploited to move yourself toward community-based learning as an integrated view of how to teach.
As teachers make this discovery about work groups, they may exhibit a growing desire to nurture and exploit this new view of school and students. This is one of the paradigm shifts which leads to effective use of the curriculum embedded in the community. The student, as empowered person or citizen, affects the nature of a teacher’s view of his or her role in the classroom, school, field, and community.
Teachers who build their curricula around the community and environment often directly alter their students’ attitudes toward their educations. The perceptive observer will notice this in the way students become involved and invested in their educations, and empowered as persons. From time to time, I’ve heard teachers notice particular students working in the lab make an observation like, “Is that Bethany organizing her group? She doesn’t do that in my class.”
This change in students’ attitudes and work is noticeable, and most teachers who observe it are impressed, and with support, eventually changed by what they see. Students’ empowerment influences and empowers their teachers. Certainly, I was one of those teachers. I’d like to describe three teachers’ involvement in community and environment based learning, and the effect their students had on them. Each teacher is a composite of more than one teacher, but the teachers in each description approached the work of teaching in similar ways, and had about the same experience.
The first is a veteran middle school math teacher who used his authority to maintain control in the classroom, sent misbehaving students into the empty hallway, delivered his curriculum via lecture and practice, and was marginally successful in delivering content. One day he decided to try a regional watershed program where students and their teachers made observations on environmental parameters in watersheds. During the first field trip, he mainly walked around as a spectator, which many teachers do in these situations. Later, we talked about possible follow-up activities, and I suggested making three-dimensional topographic models of their station from thick poster board. This would give him an opportunity to observe work groups; hopefully one or more would be effective.
The next day, he asked me to start the project, and said he would butt in whenever he felt comfortable. Once the students started working, he expressed surprise at the work, communication, and management skills various students exhibited. He had never noticed his students were all different! He took over right away, used his own personal knowledge, skills, and understandings to run the class, and over the next two years moved from being a top-down, didactic, authoritarian teller of content to a comfortable, student-centered facilitator of effective work groups. That was a gift from his students, whose personal empowerment so impressed him. And one of his gifts to them was a dramatic increase in the scores of the bottom 25th percentile.
(In many of my blogs, I refer to the ‘bottom 25th percentile.’ I do this because, if you can raise the achievement of that particular group in a classroom of students, then the achievement of all students in the class will improve along with them.)
The second is a middle school language arts teacher who was relatively new to teaching, and who involved her students in the community and environment. One day, she decided she’d like to have her class develop a watershed model in a courtyard at the school. She organized the class into groups who learned how the fountain in the courtyard worked, and modified its flow so it resembled a stream. Others learned about rocks in streams, native plants in streams and on stream banks, etc. These students were already empowered by their teacher’s competence as a motivator and facilitator, so they continued to be involved and invested in their educations, and their success in this new project reinforced the teacher to continue to be involved in community and environment based learning.
(My last project with her was a tutor-assisted reading program in which college students volunteered to tutor groups of 4-5 students, and significantly improved the reading levels of her bottom 25th percentile. Authentic education involving effective work groups pays off in any discipline and academic level.)
The third is a veteran middle school social studies teacher who did little planning for her classes, didn’t maintain a structure in her classroom that was conducive to learning, and didn’t develop effective work groups. As part of our project we would come to her school to mentor her on field work. One time we took her class out to learn to find and map elements of watersheds. Once we were on the school grounds with the students, she left to rest in the faculty room. Over a period of two years, she never became involved in activities the students engaged in the school. But she did stay with them when they manned information booths about their projects at informational open houses at study sites in the community. She became comfortable on field trips, participated in some of the work her students were doing, and encouraged some of them to do good work. The students who grew in the projects she started did so mainly on their own; the opportunity was all they required. Her bottom 25th percentile didn’t improve.
This teacher had, over several years by the time our project finished, entered and traveled along the acquisition phase of the learning curve. In some areas, she moved into transition to the proficiency phase. Should she ever move some distance up that phase, the work might involve and invest her in her teaching. She is bright, but not empowered by her work or by her students. The fact that she did move some way into the learning curve tells me she represents a first approximation of a fully empowered teacher. If I were her mentor, I’d use that information to set the next approximation and move her toward it.
There’s a good lesson here. If we are to get our students to the point where they empower us, we have to be intimately involved in what we do. Seems obvious, but not to everyone. The third teacher was interested in the community and environment, but never became intimately involved with the work. Because the work is almost always authentic, that alone helps us to become very involved in it. That, plus our commitment to our profession, teaching.
 This is the seventeenth installment of “Teaching in the Environment,” a new, regular feature by CLEARING “master teacher” Jim Martin that explores how environmental educators can help classroom teachers get away from the pressure to teach to the standardized tests, and how teachers can gain the confidence to go into the world outside of their classrooms for a substantial piece of their curricula. See the other installments here, or search Categories for “Jim Martin.”


